Why Json.NET? Unity does now include a Json utility, but it falls flat in many cases. It doesn’t serialize nested classes well (classes with multiple levels of inheritance), it can’t rename the Json object’s variables to something more appropriate for your code base, and there’s really not a lot of options. However, it does claim to be “…significantly faster than popular .NET JSON solutions…”. One of my favorite features of Json.NET is that it can easily serialize private fields and public fields with private setters. This allows for maintaining access restriction in you code base’s models without requiring the use of 2 objects: one that can serialize with public properties and another that is for use throughout the application with restricted public fields (or whatever custom logic you may need). You can even set up a constructor that the serializer is instructed to use. It’s quite powerful!
This tutorial will show some basic usage of Json.NET to handle deserialization of Json responses from the Twitter API. You’ll be creating an app that can simply search Twitter statuses and then display them.
Note: This tutorial assumes you have at least a beginner’s knowledge of C# and Unity 3D. It will be helpful if you also have some experience with making HTTP requests, but not necessary as the requests in this tutorial are well defined.

Getting Started
- Create a new Unity 2D project and call it Twitter Searcher.
- Download Json.Net from here: github.com/JamesNK/Newtonsoft.Json/releases. You’ll want the release zip, not source code.
- In the zip there should be a folder called Bin. This is where all the DLLs live. Since Unity uses an implementation of .NET 3.5 you’ll want to select the library in the zip archive’s Net35 folder. Import Newtonsoft.Json.dll into a new Unity project in a folder called Plugins. You may also want to import the XML file as this contains documentation for the library, but you can also rely on the website’s documentation found here www.newtonsoft.com/json.
Now that the basics are imported you’ll also need to get access tokens to use Twitter’s API.
- Go to dev.twitter.com and sign up as a developer (there should be a Join button in the upper right corner of the screen). Fill out the necessary forms and follow their steps to complete the process.

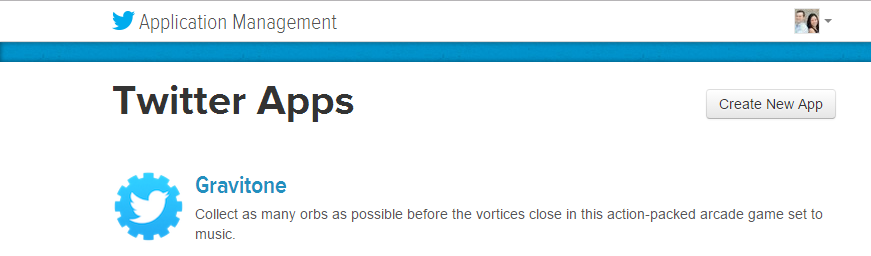
- Once you’ve completed Twitter’s verification process you’ll be able to to click on My Apps (should be at the top of the page) and then on the next page click on Create New App.

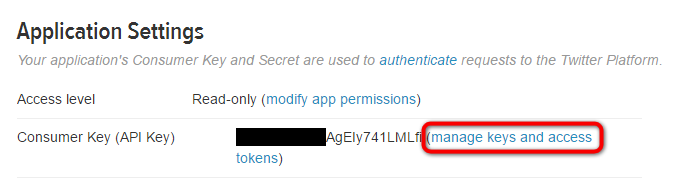
- After creating your application you’ll need to get the Consumer API Key and the Consumer Secret. Under the Application Settings section you’ll see the Consumer Key and a link to manage keys and access tokens. Click on that link.
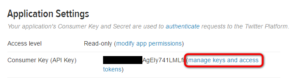
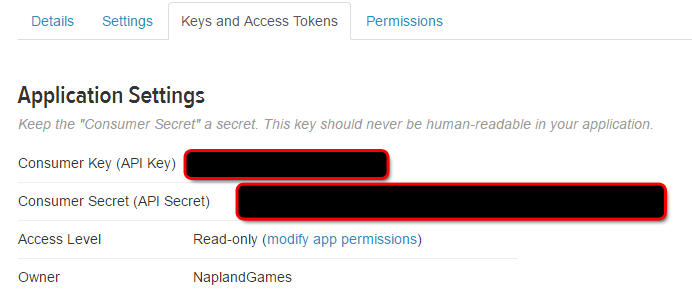
- On the next page you will see you Consumer Key and Consumer Secret. In the image below they’ve been blacked-out. Copy these keys into a text file.


Making Twitter API Requests
The first class you’ll create is called TwitterSearchHandler. This will be responsible for getting authorization from Twitter and making the search request. The first task it will need to accomplish is connecting to Twitter and getting authorization via OAuth. Start the class like so:
|
1 2 3 4 5 6 7 8 9 10 11 12 13 14 15 16 17 18 19 20 21 22 23 24 25 26 27 28 29 30 31 32 33 34 35 36 37 38 39 40 41 42 43 44 45 46 47 48 |
using UnityEngine; using System; using System.Collections; using System.Collections.Generic; using System.Text; public class TwitterSearchHandler : MonoBehaviour { // 1 - The Consumer API Key you received from Twitter private string apiKey = ""; // 2 - The Consumer Secret you received from Twitter private string secret = ""; // 3 - The coroutine the will make the authorization request private IEnumerator MakeOAuthRequest(string apiKey, string apiSecret) { string oAuthUrl = "https://api.twitter.com/oauth2/token"; // 3-1 byte[] body = Encoding.UTF8.GetBytes("grant_type=client_credentials"); // 3-2 Dictionary<string, string> headers = new Dictionary<string, string>(); string base64KeyAndSecret = Convert.ToBase64String(Encoding.UTF8.GetBytes(apiKey + ":" + apiSecret)); headers.Add("Authorization", "Basic " + base64KeyAndSecret); // 3-3 WWW request = new WWW(oAuthUrl, body, headers); yield return request; // 3-4 if (!string.IsNullOrEmpty(request.error)) { Debug.LogErrorFormat("UnityEngine.WWW Error: {0}", request.error); } Debug.Log("Response: " + request.text); } // 4 - Just run authorization on start for now. private void Start() { StartCoroutine(MakeOAuthRequest(apiKey, secret)); } ... |
- apiKey : Enter your Consumer API Key here.
- secret : Enter your Consumer Secret here.
-
MakeOAuthRequest(string apiKey, string apiSecret) : This coroutine runs a Unity WWW request to Twitter’s OAuth URL.
- The body of this request needs to be a byte array from the string "grant_type=client_credentials" .
- The WWW request must have an Authorization header with the apiKey and apiSecret. These must be encoded to a byte array and then converted to a base64 string as is show in the code.
- The request is sent and the coroutine continues its execution when a response (or error) is received.
- After the response is received check to see if it was an error and output that information to the console. Also output to the console any text data that was received.
Create an empty game object in your scene and name it TwitterSearchHandler. Add the script to it as a component and run the scene. If the request was successful the console should have a message like this:
|
1 |
Response: {"token_type":"bearer","access_token":"AAAAAAAAAAAAAAAAAAAAACopygAAAAAAOzSaoftcn3tdOI0m4qDfGgyfpdc%3DhoTSgBMM1dHnWUuJB4zPpMNsnrsksAl6f6cgnHJrgceTrZ1qqD"} |
This is the access token that will be used by your app to make future requests. The actual token you see should be different. The important part is that you don’t get an error message. If you do, double check your API keys and the code to ensure everything is being sent correctly. This can be difficult, so don’t be discouraged if you get it wrong the first time (just do a Google search and see how many people failed their first time!).
Handling The Authorization Response
Most of the time you’ll want to do something with the response from an HTTP request. One of the best ways to do this is by creating a delegate type that can pass the response data to some other method. You’ll add a parameter to your coroutine so that you can assign the delegate and call (or Invoke) the delegate when a response is received. A delegate is a reference to a method that can be called at some later time. This is really handy for making your requesting method (in this case the MakeOAuthRequest coroutine) generic and able to do a variety of different things when the response is received.
Create a new file and name it OAuthResponse.cs this will contain the delegate definition for the response and the object that will hold the response data. First, create a public class called OAuthResponse like so:
|
1 2 3 4 5 6 7 8 9 10 11 12 13 14 15 16 17 18 19 20 21 22 23 24 25 |
public class OAuthResponse { // 1 public string token_type; public string access_token; // 2 public bool isValid { get { return !string.IsNullOrEmpty(token_type) && !string.IsNullOrEmpty(access_token); } } // 3 public override string ToString() { return string.Format( "isValid: {0}\ntoken_type: {1}\naccess_token: {2}", isValid, (string.IsNullOrEmpty(token_type) ? "NULL" : token_type), (string.IsNullOrEmpty(access_token) ? "NULL" : access_token) ); } } |
- Take a look at the string that was returned from the OAuth request in the previous section. Notice that is has 2 variables in it: token_type and access_token . These are defined in the above class with the same exact names. The name must be the same as the response’s string for the Json serialization to know where to put the values (unless you tell Json.NET otherwise – more on that later). The variable types must also be appropriate (i.e. in this case they are both strings).
- isValid : This preforms a simple check to ensure that neither of the variables are empty (or null). If they are then something went wrong.
- ToString() : Whenever you create a model class (or pretty much any class) it’s a good practice to override ToString so that you can easily examine and debug the object.
Now that you have the model object defined you can also define the delegate type that can receive this object. This can go in the same file or it’s own separate file if you like. Since the delegate is specific to the OAuthResponse object, it’s a good idea to place it in the same file so there’s little need to search for it (and it only requires a single line).
|
1 |
public delegate void OAuthResponseDelegate(OAuthResponse response); |
Back in the TwitterSearchHandler class add using Newtonsoft.Json to the top of the file and redefine the MakeOAuthRequest() coroutine like so:
|
1 2 3 4 5 6 7 8 9 10 11 12 13 14 15 16 17 18 19 20 21 22 23 24 25 26 27 28 29 30 31 32 33 34 35 36 37 38 39 40 41 42 43 44 45 |
using Newtonsoft.Json; ... ... private IEnumerator MakeOAuthRequest( string apiKey, string apiSecret, // 1 OAuthResponseDelegate OnResponse) { string oAuthUrl = "https://api.twitter.com/oauth2/token"; byte[] body = Encoding.UTF8.GetBytes("grant_type=client_credentials"); Dictionary<string, string> headers = new Dictionary<string, string>(); string base64KeyAndSecret = Convert.ToBase64String(Encoding.UTF8.GetBytes(apiKey + ":" + apiSecret)); headers.Add("Authorization", "Basic " + base64KeyAndSecret); WWW request = new WWW(oAuthUrl, body, headers); yield return request; // 2 if (!string.IsNullOrEmpty(request.error)) { Debug.LogErrorFormat("UnityEngine.WWW Error: {0}", request.error); } // 3 OAuthResponse response = null; // 4 if (!string.IsNullOrEmpty(request.text)) { response = JsonConvert.DeserializeObject<OAuthResponse>(request.text); Debug.LogFormat("OAuthResponse:\n{0}", response.ToString()); } // 5 if (OnResponse != null) OnResponse.Invoke(response); } ... |
- This new parameter will allow you to assign the delegate’s method that will be called when the request finishes.
- Now the class really only needs to report the error string if it is not empty.
- Create a variable ( response ) to contain the OAuthResponse object, set it to null for now.
- Only attempt to convert the request.text to an OAuthResponse if request.text is not empty. Deserialization of the Json string (request.text) is a simple single line. While in development it’s a good idea to output the string representation of the OAuthResponse so that you can check it in the console.
- If the delegate method is not null (this would only happen if someone decided to actually input null as the parameter…), then Invoke the delegate and pass through the OAuthResponse object ( response ) as its parameter.
Now that the MakeOAuthRequest method has been rewritten to allow a delegate parameter you’ll also want to define a method that will handle the response. In this application you’ll want to make a search request when the OAuth is valid. Add the following method to the TwitterSearchHandler class:
|
1 2 3 4 5 6 7 8 9 10 11 12 |
... private void MakeSearchRequest(OAuthResponse response) { if (response == null || !response.isValid) { Debug.LogError("response is null or invalid"); return; } Debug.Log("Authorization received"); } ... |
As you can see, this method doesn’t do anything special yet, but you need it so that you can rewrite the class’s StartCoroutine call to MakeOAuthRequest. You’re also not going to always want to run the authorization from the Start method, so create another method that will eventually be used via a UI element to run the entire authorization and search procedure:
|
1 2 3 4 5 6 7 8 9 10 11 12 |
... private string query = ""; public void MakeSearchRequest(string query) { this.query = query; if (!string.IsNullOrEmpty(apiKey)) { StartCoroutine(MakeOAuthRequest(apiKey, secret, MakeSearchRequest)); } } ... |
Now your Start method can be rewritten as this for now:
|
1 2 3 4 5 6 |
... private void Start() { MakeSearchRequest(""); } ... |
Now run the scene and you should have the following output in your console (the actual access_token will vary):
|
1 2 3 4 |
OAuthResponse: isValid: True token_type: bearer access_token: AAAAAAAAAAAAAAAAAAAA |
So far this doesn’t really do anything different than before, but that will come soon. Before you go much further you’ll need a way to read the errors that might be sent back from the Twitter API.
Handling Twitter API Errors
Valid responses are great, but what happens when the API responds with an error? To check this out you can add a line to output the request.text to the console via the MakeOAuthRequest coroutine. Simply change your API key and the API will return a Json object like this:
{"errors":[{"code":99,"message":"Unable to verify your credentials","label":"authenticity_token_error"}]}
The structure of this Json object is like so:
- errors: this is an array (notice the [ and ]). There could be more than one error.
- code: an integer representing some error code.
- message: a string providing more information on the error.
- label: a string that is a more technical description of the error.
Create another class and call it Error. It’s pretty short and just contains public properties to contain the array elements that were outlined above.
|
1 2 3 4 5 6 7 8 9 10 11 12 13 |
public class Error { public int code; public string message; public string label; public override string ToString() { return string.Format( "code: {0}\nmessage: {1}\nlabel: {2}", code, message, label); } } |
Since the response can contain an array of errors it will also be helpful to easily convert those to a single string. Define the following extension class to help out with that.
|
1 2 3 4 5 6 7 8 9 10 11 12 13 14 15 16 17 18 19 |
public static class ErrorExt { public static string ToStringExt(this Error[] errors, string separator = "\n") { string s = ""; for (int i = 0; i < errors.Length; i++) { s += errors[i].ToString(); if (i < errors.Length - 1) s += separator; } if (string.IsNullOrEmpty(s)) s = "NONE"; return s; } } |
Now that the Error class is all set up you can make use of it in the OAuthResponse class. It is also possible that other requests will have errors, so the Error class will be reused when building other class models that contain the deserialized Json data. In the OAuthResponse class add the following public property to contain the array of possible errors:
|
1 2 3 |
... public Error[] errors; ... |
Also, rewrite the ToString() method to convert that array of errors to a string for output to the console. This will make use of that extension method you just wrote:
|
1 2 3 4 5 6 7 8 9 10 11 |
public override string ToString() { return string.Format( // NEW "isValid: {0}\ntoken_type: {1}\naccess_token: {2}\nerror(s):{3}", isValid, (string.IsNullOrEmpty(token_type) ? "NULL" : token_type), (string.IsNullOrEmpty(access_token) ? "NULL" : access_token), // NEW ((errors == null || errors.Length == 0) ? "NONE" : "\n" + errors.ToStringExt()) ); } |
Now, run the scene again with an incorrect API key and you should see the following in the console:
|
1 2 3 4 5 6 7 8 |
OAuthResponse: isValid: False token_type: NULL access_token: NULL error(s): code: 99 message: Unable to verify your credentials label: authenticity_token_error |
Now the OAuthResponse class can contain error information if something goes wrong and you can easily read the information. Furthermore, now that the information is in a data structure you could actually do something with it. In this case it would be up to you, the developer to fix any errors with OAuth before releasing the product, but in other cases, like a user logging in to a system, you may want to provide some feedback to the user to tell them what went wrong.
Have no fear! The application will be making search requests soon. You’ll need a couple more classes for that. You should start to see a pattern emerging in the code showing how much of this will be reusable.
Handling Search Responses
Twitter’s API has a search response structure that will require us to write two classes:
- SimpleTweet – this class will contain the actual information for a specific twitter status (or tweet). My implementation isn’t using all of the data available, but just what we need. Take a look at the Twitter API reference for a full list of data available (https://dev.twitter.com/overview/api/tweets).
- SearchResponse – this class contains an array of SimpleTweets to hold all of the statuses from the search, it also contains an array of errors. This is the structure of the Json response we will be getting back from the Twitter API.
First, create a new class called SimpleTweet and define it like so:
|
1 2 3 4 5 6 7 8 9 10 11 12 13 14 15 16 17 18 19 20 21 22 23 24 25 26 |
using Newtonsoft.Json; public class SimpleTweet { [JsonProperty("created_at")] public string createdAt { get; private set; } [JsonProperty("id_str")] public string id { get; private set; } [JsonProperty] public string text { get; private set; } public bool isValid { get { return !string.IsNullOrEmpty(text); } } public override string ToString() { return string.Format( "created_at: {0}\nid_str: {1}\ntext: {2}", createdAt, id_str, text); } } |
Notice that I’m using something new here: the JsonProperty attribute. I’m using it because I want the SimpleTweet model to have restricted access to the class’s properties. I want the properties to be read only. Therefore they have a public get and a private set. In the Error class I simply made these public. You can do that, but then you can’t be certain that some programmer in the future won’t decide to set one of those properties and muck something up. So in the name of good object oriented design, I’d prefer them to be only settable privately. Json.NET will automatically serialize public properties, but when access is restricted the property needs to use the JsonProperty attribute so that the serializer knows it should set those variables. Also, the Json data property names ( created_at and id_str ) do not conform to typical C# naming conventions, so I use the JsonProperty attribute with its optional parameter of the incoming property name (i.e. the name that is used in the Json data string) to map it to a more properly named variable. Beyond that, there’s really no new concepts in this class. I have a public bool property to tell is if the SimpleTweet is valid (i.e. it isn’t an empty text response) and a simple ToString method to help us with any needed debugging.
Next, we need a container for these SimpleTweets that conforms to the Json data response that will come from Twitter’s API. This is the SearchResponse class.
|
1 2 3 4 5 6 7 8 9 10 11 12 13 14 15 16 17 18 19 20 21 22 23 24 25 26 27 28 29 30 31 32 33 34 35 36 37 38 39 40 41 42 43 44 45 46 47 48 49 50 51 52 53 54 55 56 57 58 59 60 61 62 |
using Newtonsoft.Json; public delegate void SearchResponseDelegate(SearchResponse response); public class SearchResponse { [JsonProperty("statuses")] private SimpleTweet[] statusesIn; [JsonIgnore] public SimpleTweet[] statuses { get { if (statusesIn == null || statusesIn.Length < 1) { return new SimpleTweet[0]; } SimpleTweet[] immutable = new SimpleTweet[statusesIn.Length]; statusesIn.CopyTo(immutable, 0); return immutable; } } [JsonProperty("errors")] private Error[] errorsIn; [JsonIgnore] public Error[] errors { get { if (errorsIn == null || errorsIn.Length < 1) return new Error[0]; Error[] immutable = new Error[errorsIn.Length]; errorsIn.CopyTo(immutable, 0); return errorsIn; } } public override string ToString() { string statusesOut = ""; if (statuses == null) statusesOut = "\tNULL"; else if (statuses.Length <= 0) statusesOut = "\tno results"; else { for (int i = 0; i < statuses.Length; i++) { statusesOut += "\t" + statuses[i].ToString(); if (i < statuses.Length - 1) statusesOut += "\n"; } } return string.Format("statuses:\n{0}\nerrors:{1}", statusesOut, errors.ToStringExt()); } } |
First, take note that I’ve defined a delegate, SearchResponseDelegate , in this file. This will be used to handle callbacks when search requests are complete.
Next, notice that I’m using the JsonProperty attribute again. This time I’m using it on private fields because I want to do some operations on the public properties that will be accessed by other classes. Since those public properties may be serialized by Json.NET I’ve marked them with the JsonIgnore attribute. This isn’t entirely necessary because I’m only deserializing a Json data string into this class, but I wanted to show it to you, and who knows, we may have a reason to serialize this class back into a Json data string and if these properties were not ignored, then we’d have double the data in our string!
One final note I’d like to mention is that I’m making these get accessors so that other classes can’t inadvertently make changes to the actual data. I’ve made it immutable by creating a copy of the input/deserialized array. So any changes to the array that has been accessed (errors or statuses) doesn’t affect the underlying data. It is immutable.
Now that we have our data classes (models) we can finally have a place where we can store the search responses and start displaying them (view).
Finalizing TwitterSearchHandler
We have a little bit of work left to do in the TwitterSearchHandler class so that we can finally deal with search result responses. At the top of the class you’ll need to add the following:
|
1 2 3 4 5 6 7 8 9 |
... // 1 private OAuthResponse authorization; // 2 [Serializable] public class HandleStatusesUnityEvent : UnityEngine.Events.UnityEvent<SimpleTweet[]> { } public HandleStatusesUnityEvent OnStatusesRecieved; ... |
- Add an OAuthResponse object. We’ll use this to prevent repeated authorization requests because it’s not really necessary to get authorization before each request. We really only need to do it once in the life cycle of the app. We can also use the OAuthResponse ‘s isValid property to invalidate the authorization and tell us when to request a new one. I’m not going to cover that in this tutorial, but you’ll see it implemented in the final project.
- Create a class inside of TwitterSearchHandler called HandleStatusesUnityEvent . This will need to be marked as Serializable so that the Unity Editor will display objects of this type it in the inspector, our object that will be accessible from the inspector is OnStatusesRecieved . This will add an area to the inspector where we can assign another class’s method just like what can be done in the OnClick callback for a Unity UI button. We’ll come back to this in the next section.
Next, we’ll need a coroutine to handle a WWW request for requesting the search via the Twitter API. Add the following method to TwitterSearchHandler :
|
1 2 3 4 5 6 7 8 9 10 11 12 13 14 15 16 17 18 19 20 21 22 23 24 25 26 27 28 29 30 31 32 33 34 35 36 37 38 39 40 41 42 43 44 45 |
... public enum ResultType { mixed, recent, popular }; IEnumerator MakeSearchRequestCoroutine( string accessToken, string query, SearchResponseDelegate OnResponse, ResultType resultType = ResultType.mixed, int count = 100) { // 1 string url = "https://api.twitter.com/1.1/search/tweets.json?q=" + WWW.EscapeURL(query); if (resultType != ResultType.mixed) url += "&result_type=" + resultType.ToString(); if (count < 100) url += "&count=" + count; // 2 Dictionary<string, string> headers = new Dictionary<string, string>(); headers.Add("Authorization", "Bearer " + accessToken); // 3 WWW request = new WWW(url, null, headers); yield return request; // 4 if (!string.IsNullOrEmpty(request.error)) { Debug.LogErrorFormat("UnityEnigine.WWW Error: {0}", request.error); } // 5 SearchResponse searchResponse = null; if(!string.IsNullOrEmpty(request.text)) { searchResponse = JsonConvert.DeserializeObject<SearchResponse>(request.text); Debug.Log(searchResponse.ToString()); } // 6 if (OnResponse != null) OnResponse.Invoke(searchResponse); } ... |
Note the parameters for the MakeSearchRequestCoroutine() coroutine. The required parameters are accessToken (obtained from our OAuth request), the query to search for, and a SearchResponseDelegate that will get called when the request completes. I’ve included 2 optional parameters resultType and count. The resultType can be one of three choices and defined by its enum: mixed, recent, or popular. I chose mixed as the default. The count puts a cap on the number of results retrieved. Twitter’s API limits this to 100 by default, so if you enter a value for the count parameter that is less than 100 it will be used in the request.
- First we build the request URL string based off of the query, result type, and count.
- Next we define the the header which contains an Authorization key with the value Bearer and the accessToken . Pay special attention to the space after Bearer, it’s important.
- Now we send up the request and continue execution when we have our response.
- If the request has an error then write a console message for the developer to see.
- If the request.text (the response) is not empty the deserialize it into our new SearchResponse object. We’ll also output this to the console so that we can see the results without having the app’s UI all connected. This should be removed before production.
- Finally invoke the delegate with the values from the searchResponse.
Next, you’ll need a method that can be used to handle that response. This will be used as the MakeSearchRequestCoroutine()’s OnResponse parameter. Note that this method must have a parameter with the type SearchResponse to be used as this delegate type.
|
1 2 3 4 5 6 7 8 9 10 11 12 13 14 15 16 17 18 19 20 21 22 23 |
... private void HandleSearchResponse(SearchResponse response) { // 1 if (response == null || response.statuses == null) { Debug.LogError("Invalid response: NULL"); return; } // 2 if (response.statuses.Length == 0) { Debug.LogError("No results"); // A good point to ask the user if they'd like to try another query return; } // 3 if (OnStatusesRecieved != null) OnStatusesRecieved.Invoke(response.statuses); } ... |
- If the response is null or the response.statuses is null (the array of actual tweets) then we log the error for the developer to handle.
- If the response.statuses array contains 0 elements then we didn’t get any results. This would be a good point to show an alert to the user asking them to try another search.
- Finally, we invoke OnStatusesRecieved which we declared in the first part of this section. This will be assigned in the inspector and will call another method in another class that will handle the display (view) of the results. We’ll be doing that in the next section.
Next, you’ll need to redefine the MakeSearchRequest(OAuthResponse response) method to start our MakeSearchRequest coroutine like so:
|
1 2 3 4 5 6 7 8 9 10 11 12 13 14 15 16 17 18 19 |
private void MakeSearchRequest(OAuthResponse response) { if (response == null || !response.isValid) { Debug.LogError("response is null or invalid"); return; } // 1 authorization = response; // 2 StartCoroutine( MakeSearchRequestCoroutine( response.access_token, query, HandleSearchResponse, count: 10)); } |
- First we’ll now store the response in the class’s authorization field so that we don’t unnecessarily reauthorize the user (we’ll be modifying MakeOAuthRequest to hand this for us next).
- Next we simply start the new MakeSearchRequestCoroutine with the proper parameters: the response’s access_token , the query we want to search for, our new HandleSearchResponse method as the callback for when the request receives a response, and I’ve defined the count to be 10 just to give us a quick, small response (feel free to change that to whatever you like – less than 100 — or omit it for up to 100 results).
Now you should change the MakeOAuthRequest coroutine to skip future authorization requests instead of getting authorization every time a search request is made. Add the following to the beginning of the MakeOAuthRequest method:
|
1 2 3 4 5 6 7 8 9 10 |
... // Skip future authorization requests. if (authorization != null && authorization.isValid && OnResponse != null) { OnResponse.Invoke(authorization); Debug.Log("Do not reauth"); yield break; } ... |
Finally, change
MakeSearchRequest(""); in the start method to perform an actual search. Try “NaplandGames” as the parameter (note the lack of a space). You should now run the project and make sure it is free of errors. The search results will only appear in the console for now. In the next section we’ll create a script that will handle the display of the results in UI. Here’s what the console log should look like:

Displaying The Search Results
In the final part of this tutorial we’ll be creating a class that will handle the display of the search results in Unity’s UI. This is the view component of the application. After the class is created we’ll connect it to the TwitterSearchHandler class via Unity’s inspector. Create a new MonoBehviour derived class (or script) and call it TwitterStatusViewHandler below are the contents of that class:
|
1 2 3 4 5 6 7 8 9 10 11 12 13 14 15 16 17 18 19 20 21 22 23 24 25 26 27 28 29 30 31 32 33 34 35 36 37 38 39 40 41 42 43 44 45 46 47 48 49 50 51 52 53 54 55 56 57 58 |
using UnityEngine; using UnityEngine.UI; using System.Collections; using NG.TwitterApi; public class TwitterStatusViewHandler : MonoBehaviour { // 1 [SerializeField] private Text text; // 2 [SerializeField] private float delay = 2; // 3 private IEnumerator displayCoroutine; // 4 void Awake() { if (text == null) Debug.LogError("Text is null!"); } // 5 public void DisplayStatuses(SimpleTweet[] statuses) { if (statuses == null || statuses.Length < 1) { Debug.LogError("No statuses to display"); return; } if (displayCoroutine != null) StopCoroutine(displayCoroutine); displayCoroutine = DisplayCoroutine(statuses, delay); StartCoroutine(displayCoroutine); } // 6 IEnumerator DisplayCoroutine(SimpleTweet[] statuses, float delay) { WaitForSeconds wait = new WaitForSeconds(delay); int statusIndex = 0; while(true) { text.text = statuses[statusIndex].text; statusIndex++; if (statusIndex >= statuses.Length) statusIndex = 0; yield return wait; } } } |
- Define a UI Text field called text that will be assigned in the editor. This is where the Tweets will be displayed one at a time.
- Define a float called delay, this is the amount of time a single Tweet is displayed for.
- The displayCoroutine field will hold a reference to the currently running coroutine so it can be stopped when we want to display a new set of search results.
- I the Awake method we simply make sure to warn the developer that a UI Text object should be assigned otherwise we’ll get errors!
- The DisplayStatuses() method will take a parameter that is an array of statuses that is received from the request. This method will be assigned to the TwitterSearchHandler ‘s OnStatusesRecieved event via the inspector. The DisplayStatuses method simply stops the displayCoroutine if it is running, then starts a new DisplayCoroutine.
- Finally, the DisplayCoroutine method is responsible for iterating through the array of statuses and displaying them after the specified delay. Note that it will start back at index 0 when the end of the array is reached. This will give us a continuous display until a new search response is received.
Now all we need to do is hook it all up in our scene.
Setting Up The Scene
If you downloaded the starter project then most of this work will already be done. All you’ll need to do is connect the scripts. If you haven’t downloaded the starter project then here’s a quick breakdown of the scene:
- Set up the project to be 2D and the game view in some portrait mode like 9:16.
- Add a main camera with a Solid Color clear flag, the color should be a very light grey. The camera should also be Orthographic with a size of 5.
- Add a Canvas with the canvas scaler set to Scale With Screen Size and the Screen Match Mode to Shrink
- Add a child Text object to the Canvas that stretches to the Canvas size, center the text horizontally and vertically.
- Add a child Image object to the Canvas that serves as a visual indicator for searching. I used a simple UI sprite as the background then added a child Image to that which is a magnifying glass icon. Neither of these actually do anything, but serve only as an aesthetic. This is placed in the lower right of the screen.
- Add a child InputField object to the Canvas. I’ve positioned mine at the bottom of the screen and sized it so that the search icon fits to its right. I also set the Placeholder’s text to be “Search…”.
The scene should look something like this when you’re done:

Now that the scene is all set up you can start adding and connecting the scripts we’ve created.
- First, add an empty game object to the scene and name it TwitterSearch.
- Add the TwitterSearchHandler script to it.
- Add the TwitterStatusViewHandler script to it.
- In the TwitterSearchHandler component’s On Statuses Received Event add the TwitterStatusViewHandler’s DisplayStatuses method (make sure to select from the Dynamic section of the drop down)
- Finally, attach the Text object to the text field of the TwitterStatusViewHandler.
- Finally, select the input field and assign its On End Edit event to be the TwitterSearchHandler’s MakeSearchRequest method (again make sure to select from the Dynamic section of the list). This event will be fired when the user hits enter after typing in the input field or if the tap/click anywhere outside of the input field (like on the search “button”).

- Finally, make sure that the Start method of the TwitterSearchHandler no longer calls MakeSearchRequest as this will all be done through the UI.
Now run the scene and type some search string into the input field. When you tap/click outside of that field the search request is made and the results are displayed in the app!
You now have a fully functioning Twitter search app and the basis of using the twitter API.
The final project can be found here: https://github.com/Naphier/UnityJsonTwitterTutorial/releases. Note that I have added some minor changes to time-out the authorization and contain my work in its own namespace.
Further Exploration
I’d suggest reading more on the Twitter API here: https://dev.twitter.com/overview/api. Take a look at the “entities” object that comes with the status and use the “media_url” to fetch and display an image associated with a Tweet. Or maybe take a look at the “user” object that comes with the status and fetch and display the user’s profile image (“profile_image_url”). There’s a lot to explore in these status objects! Maybe explorer Json.NET further and save some of the responses to a file to load later.
Final Thoughts
Although I’ve used Json.NET for deserializing the Json objects, Unity does have a JsonUtilitly class that may suit basic needs. There’s also a ton of other Json solutions for Unity. One of note is FastJson (https://github.com/mgholam/fastJSON). This boasts much greater speeds that Json.NET, but it does have some drawbacks such as the inability to serialize private fields or make use of special constructors for classes. Hopefully the author (or community) will extend it to that functionality soon (and be able to keep their awesome speed).
Make sure to read my other article on basic serialization and saving data in Unity. As always, thanks for reading and don’t forget to subscribe!
![]()