Throughout the ages games have been controlled in a variety of ways: joysticks, gamepads, mouse & keyboard, and many more! With the advent of mobile devices new styles of input have become available to us, namely touch screen controls. In this tutorial you’ll learn how to implement two different styles of touch input in Unity:
- Virtual joystick: This is where buttons on the screen that are similar to a gamepad or joystick are used.
- Direct interaction: This is where the player directly interacts with objects in the game to control their movement, firing, and other actions.
Unity makes it incredibly easy to take advantage of different styles of input so that your game is accessible on many platforms. It’s time to tap in!
Note: This tutorial assumes that you’re familiar with the basics of the Unity Editor, its UI components, and that you have some knowledge of C#.
Getting Started
Make sure you’ve downloaded and installed the latest version of Unity from here.
Next, download the snowballcannon_starter_project for this tutorial. Then unzip it and open up the SnowballCannon project in Unity. This is the foundation for the game you’ll be implementing touch controls for.
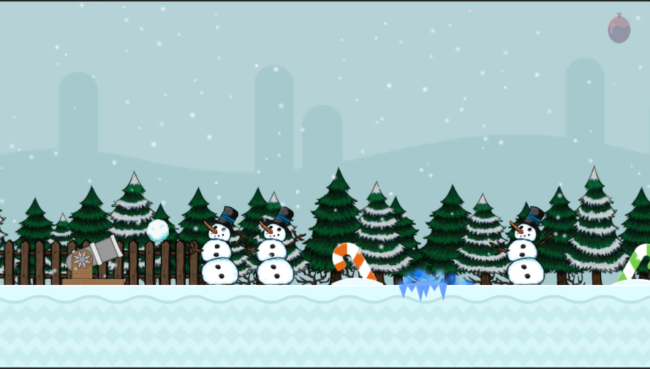
The game is a simple one: snowmen are invading your back yard! Armed with your snowball cannon you must repel their relentless attack! You have control over firing and aiming a cannon that launches snowballs at the invading snowmen. You can also drop water balloons on the ground to slow down the snowmen.
The game logic is simple: the snowmen spawn every couple of seconds and move toward the cannon. If too many snowmen reach the cannon then the game is over. The scene is set up so that you can use mouse and keyboard to play immediately (StandAloneInputController.cs). So go ahead and run the scene to play the game and check out how it works.
Before you get started with adding new controls, take a look at the class you’ll be interfacing with for controlling the cannon. Open up PlayerController.cs in your IDE (Visual Studio or MonoDevelop) and read through the code and comments to get a feel for how it works. The new classes that you’ll make for touch input will access the controls of the cannon via this class. Specifically you’ll be using the RotateCannon(int direction) and Fire() methods. In the scene hierarchy this script is attached to the Player game object.
Many of the classes are quite reuseable and the logic for the game is controlled through events that are all assigned in the inspector for the game objects (mainly Player and EnemySpawner). You’ll learn more about that throughout the tutorial.
You’ll also be using the WaterBalloonController class to make copies of the water balloons and then enable their rigidbody so that they drop onto the ground. That will be explained that in greater detail later. For now you can see an example of this in the StandaloneInputController class.
Using Unity UI for Player Input
In this section you’ll add some UI buttons to the game, create some scripts for those buttons to work intuitively, and assign the events for those buttons via the inspector.
Preparing the Scene
You’ll need to prep the scene first, make a copy of the Main.unity scene by opening it in the editor then going to the File menu and selecting Save Scene As. Save the scene as VirtualJoystick.unity.
Remove the event that enables StandaloneInputController from the OnClick event list on the PlayCanvas/Panel/PlayButton game object’s Button component like so:
Remove the event that disables StandaloneInputController from the Player game object’s Health component like so:
Great! Now you’ve removed the game’s ability to activate and deactivate the StandAloneInputController and you can no longer control the game. You’re scene is now ready for a new input method!
Adding the UI Joystick Buttons
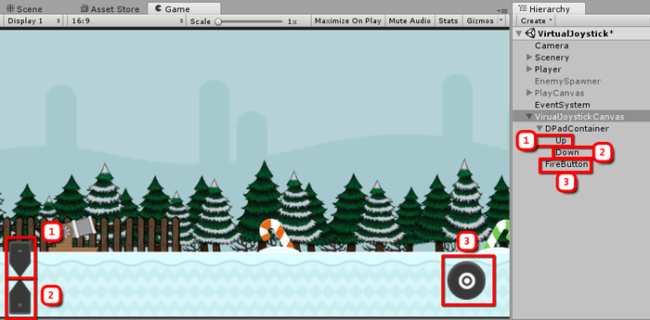
Now add a new UI Canvas to the scene and name it VirtualJoystickCanvas. Add a Canvas Group component to it and deselect the Interactable checkbox (you’ll activate this later with the PlayButton‘s OnClick event). In that canvas, add 3 buttons: one for rotating the cannon up (1), one for rotating the cannon down (2), and a third for firing the cannon (3). In the Sprites/OnScreenControls/ShadedDark folder you’ll find the sprites that are used for the buttons. The scene should look like this when you’re done setting up the UI buttons:
Adding the Events
Now that the UI is set up in the scene it’s time to make the buttons interactive. What good is a button you can’t press, right? Start with the simple one, the FireButton. To set this up simply click the button in the On Click() area of the inspector. Drag and drop the Player game object into the empty slot that appears. Then select PlayerController.Fire() from the dropdown menu like so:

Now any time this button is clicked it will fire a snowball. Nice and easy! For the Up and Down buttons there is a little more work to do. This is because the OnClick() event for a button is only fired once per click. The cannon should rotate continuously while the button is held down. To do this you’ll need to make a script to handle the state of the button and you’ll need to make use of Unity’s Event Trigger component.
Create a new C# script and name it HoldButtonEventHandler. The script will only use two namespaces:
|
1 2 |
using UnityEngine; using UnityEngine.Events; |
The UnityEngine.Events namespace contains a class called UnityEvent. When a public object of this type is added to a MonoBehaviour derived class it becomes visible in the inspector and shows up just like the OnClick() events on a Button component.
Now add the following variables to the class:
|
1 2 3 4 5 6 7 8 9 10 |
public class HoldButtonEventHandler : MonoBehaviour { // 1 // The event to fire while the button is held public UnityEvent OnButtonHeld; // 2 // This is the state of our button (is it being pressed?) private bool pressed = false; ... |
- The
OnButtonHeldevent will be invoked (or fired) when the button is being held down. This event will be assigned in the inspector similar to the OnClick event for the FireButton. - The value of
pressedwill tell the class that theOnButtonHeldevent should be invoked.
Add the following lines of code to the HoldButtonEventHandler class to finish it up.
|
1 2 3 4 5 6 7 8 9 10 11 12 13 14 15 16 17 18 |
... // 1 // This method is called from an EventTrigger component // when we press or release the button public void SetPressed(bool value) { pressed = value; } // 2 // If the button's state is pressed then we fire the // OnButtonHeld event. private void Update() { if (pressed) OnButtonHeld.Invoke(); } } |
- The
SetPressedmethod will be called from an Event Trigger that will pass the value oftrueto the method when the Up or Down button is pressed. - The
Updatemethod will continuously check to see ifpressedistrue. If it is thenOnButtonHeldwill be invoked.
Now that the script is ready it’s time to set up the components on the button to connect it all together:
- Add an Event Trigger component and add the new Hold Button Event Handler script to the Up button.
- Click the Add New Event Type button on the Event Trigger component and add a
PointerDownevent. - In the event area click the button to add a new event slot just like you did for the
OnClick()event for the fire button. - Drag and drop the Up button game object from the hierarchy window into the empty slot and select
HoldButtonEventHandlerand thenSetPressedfrom the dropdown menu. - A checkbox should now appear. The is the parameter of
SetPressed. Since this is thePointerDownevent, you’ll want to check the checkbox to indicate the bool parameter’s value istrue.
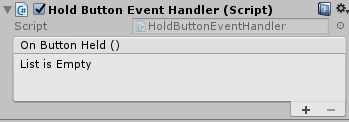
Repeat this process for a PointerUp event on the Event Trigger component, but leave the checkbox unchecked since this will be telling the HoldButtonEventHandler class that the button is no longer being pressed. Finally, in the Hold Button Event Handler component add PlayerController.RotatateCannon method call with a parameter value of 1. This will rotate the cannon up. Your Up button’s inspector should now look like this:

Repeat that same process for the Down button, but in the Hold Button Event Handler component’s call to PlayerController.RotatateCannon use a parameter value of -1 so that the cannon will rotate down.
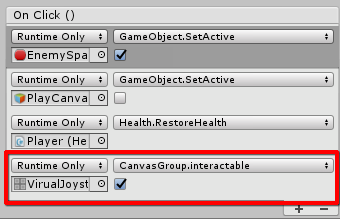
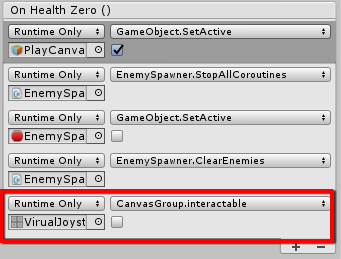
Finally, ensure that the VirtualJoystickCanvas game object’s Canvas Group component is set to interactable when the PlayButton is pressed and set to not interactable when the player dies (i.e. when the Player game object’s Health component’s OnHealthZero() event fires).
After setting that up, your PlayButton OnClick events should look like this:
Your Player OnHealthZero events should look like this:
Take a coffee break and play the game a little! If you’ve followed all of the steps correctly then you will be able to aim and fire the cannon with your new virtual joystick! Be careful not to spill that coffee on the snowmen, they’re taking enough torture from the snowball onslaught!
Input Through Direct Interaction
This is where the fun truly begins and you’ll dive deeper into Unity’s Event systems. User input on mobile devices is quite touch and go… It’s very natural to control items on the screen by touching them and moving them. In this section you’ll learn how to make the cannon rotate by swiping up or down. It’ll fire whenever you tap and lift your finger. Finally, you’ll make it so that the water balloons can be dragged and dropped onto the ground.
Scene Preparation Revisited
Repeat the same process that was described in Preparing The Scene, but this time name the copy of the scene EventInterfaces.
Select the Camera in the scene and add a Physics 2D Raycaster component. This allows Unity to detect pointer or touch input and cast a ray (a straight line) into the scene to detect what collider is hit by the ray. This is super important!
Note: Make sure to add the Physics 2D Raycaster component to your scene’s main camera. Also note that all of the scripts in this section must be attached to game objects with colliders. The collider is what tells the Physics 2D Raycaster that something is being pointed at.
Controlling The Cannon
To control the cannon via direct input you’ll need two scripts: one to handle swiping (rotating the cannon) and another to handle pointer up (firing the cannon). Start with the OnPointerUpEventHandler class.
|
1 2 3 4 5 6 7 8 9 10 11 12 13 14 15 16 17 18 19 20 21 22 23 24 25 26 27 28 29 30 31 32 33 34 35 |
public class OnPointerUpEventHandler : MonoBehaviour, IPointerUpHandler, IPointerDownHandler { // 1 // The event to fire when the pointer has been released. public UnityEvent OnPointerReleased; // 2 // Should this script be enabled on Awake? public bool enabledOnAwake = false; // 3 // Allows setting of the initial enabled state of this script. enabled == false will // prevent method events from firing. private void Awake() { enabled = enabledOnAwake; } // 4 public void OnPointerUp(PointerEventData eventData) { // If the script is not enabled then don't do anything! if (!enabled) return; // Otherwise fire the OnPointerReleased event. OnPointerReleased.Invoke(); } // 5 // IPointerDownHandler implementation is required for IPointerUpHandler to work. // It does not have to actually do anything. public void OnPointerDown(PointerEventData eventData) { } } |
Notice the similarities between this and the HoldButtonEventHandler class. Here’s how it all works:
- The
OnPointerReleasedevent will be assigned in the inspector. It’ll be used to call thePlayerController.Fire()method. enabledOnAwakewill allow or prevent the methods in this class from running until it is desired.- The
Awakemethod will simply set thisMonobehaviourenabled (or not) when it wakes up so it will respect te setting ofenabledOnAwake. - The
OnPointerUpmethod is a required method for the implementation of theIPointerUpHandlerinterface. This is what sends and receives data from Unity’s event system. This method will simplyInvoketheOnPointerReleasedevent when the pointer click (or touch) is released. - The
OnPointerDownmethod doesn’t actually do anything in this class, but it is required (along withIPointerDownHandler) to makeOnPointerUpwork.
This class inherits from MonoBehaviour, but also notice that it implements two interfaces: IPointerUpHandler and IPointerDownHandler (these are both in the UnityEngine.EventSystems namespace). Interfaces can be thought of as contracts or templates that the class is going to specifically define (i.e. implement). If you’re using Visual Studio, you may notice that when you type in these interface names they are underlined with a red mark. You can hover your mouse over these words, click on the light bulb icon, and select Implement interface, then Visual Studio will create stubs for the methods that are required by the interface.

Note: It is very important that you implement both
IPointerUpHandlerandIPointerDownHandler.
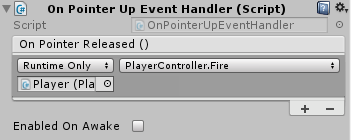
Go back to the Unity Editor and add this new script to the Player game object. Assign PlayerController.Fire to the OnPointerReleased() event. Make sure that Enabled On Awake checkbox is off. Your inspector should look like this:
Don’t press play yet! There’s still some work to do. Next, make a class to handle the rotation of the cannon, call it SwipeEventHandler. The class is very similar to the OnPointerUpEventHandler class.
|
1 2 3 4 5 6 7 8 9 10 11 12 13 14 15 16 17 18 19 20 21 22 23 24 25 26 27 28 29 30 31 32 33 34 35 36 37 38 39 |
using UnityEngine; using UnityEngine.Events; using UnityEngine.EventSystems; public class SwipeEventHandler : MonoBehaviour, IDragHandler { // 1 // Event to fire when the drag moves upward public UnityEvent OnDragUpward; // 2 // Event to fire when the drag moves downward public UnityEvent OnDragDownward; // Should this script be enabled on Awake? public bool enabledOnAwake = false; // Allows setting of the initial enabled state of this script. enabled == false will // prevent method events from firing. private void Awake() { enabled = enabledOnAwake; } // 3 public void OnDrag(PointerEventData eventData) { // If the script is not enabled then don't do anything! if (!enabled) return; // If the change in Y position of the pointer is positive // then the user is dragging upward. If it is negative // then the user is dragging downward. if (eventData.delta.y > 0) OnDragUpward.Invoke(); else if (eventData.delta.y < 0) OnDragDownward.Invoke(); } } |
Here’s what it all does:
- The
OnDragUpwardevent will be assigned in the inspector. This will be used to call thePlayerController.RotateCannon(1)method to rotated the cannon upward. - The
OnDrageDownwardevent will do the opposite and be used to rotate the cannon down. - The
OnDragmethod is the method required byIDragHandler. This method uses itseventDataparameter’s change in y position to decide whether to invokeOnDragUpwardorOnDrageDownward.
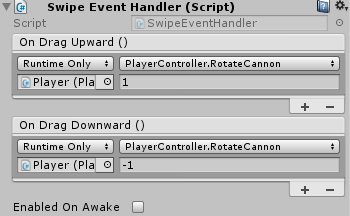
Back in the Unity Editor, add this script to the Player game object and assign the OnDragUpward() event to call PlayerController.RotateCannon with a parameter value of 1. Do the same with OnDragDownward but use a parameter value of -1 to rotate the cannon down. Make sure that Enabled On Awake is off. The inspector for this component should look like this:
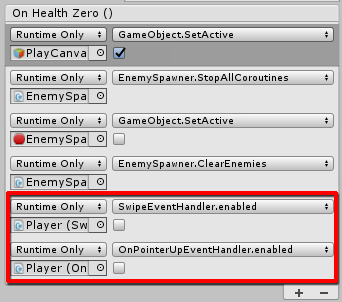
Similar to before, ensure that these components are correctly activated when the PlayButton is pressed and deactivated when the Player game object’s Health component’s OnHealthZero event is fired. The inspector for the Player game object’s Health component should look like this:
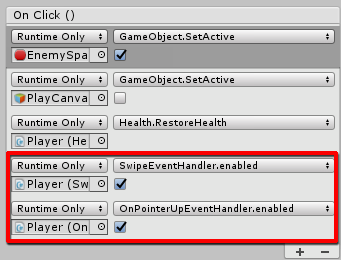
Finally, make sure that the PlayButton game object’s OnClick() event properly enables the SwipeEventHandler and OnPointerUpHnadler. It’s inspector should look like this when you’re done:
The code is pretty short and sweet and these classes are highly reusable. It’s time to take a short break and play a little! If everything is connected properly you should be able to aim the cannon by clicking and dragging up or down over the cannon, every time the mouse button is released (or finger is lifted) the cannon will fire.
Dragging and Dropping Water Balloons
In the final part of this tutorial you’ll set up another event handler to allow the user to drag and drop water balloons so they fall onto the ground and create an ice patch to slow down the snowmen. Create a new class called DragDropEventHandler with the following code:
|
1 2 3 4 5 6 7 8 9 10 11 12 13 14 15 16 17 18 19 20 21 22 23 24 25 26 27 28 29 30 31 |
using UnityEngine; using UnityEngine.Events; using UnityEngine.EventSystems; public class DragDropEventHandler : MonoBehaviour, IBeginDragHandler, IDragHandler, IDropHandler { // Event to fire when dragging begins - assignable in the inspector public UnityEvent OnDragStart; // 1 [System.Serializable] // Mark this as serializable so OnDragMove will show in the inspector. public class Vector3Event : UnityEvent<Vector3> {} // Custom UnityEvent with Vector3 parameter. // 2 // Event to fire when drag is moving - assignable in the inspector public Vector3Event OnDragMove; // Event to fire when drag stops - assignable in the inspector public UnityEvent OnDragReleased; // Allows setting of the initial enabled state of this script. enabled == false will // prevent method events from firing. public bool enabledOnAwake = false; private void Awake() { enabled = enabledOnAwake; } ... |
Many parts of this class are exactly the same as previous classes, so they won’t be explained again. In this class there is a another class, Vector3Event. UnityEvents can have have up to four parameters, but you need a little extra to get them to show in the inspector. Here’s how it works:
- The
Vector3Eventclass is a custom event that can accept aVector3parameter. The class must be marked[System.Serializable]to getVector3Eventvariables to display in the inspector. - The
OnDragMoveevent will show up in the inspector just like the other events that you’ve used. This event will be used to control the positions of the water ballons as they’re dragged.
The next part of this class will implement the required methods for the IBeginDragHandler, IDragHandler, and IDropHandler interfaces.
|
1 2 3 4 5 6 7 8 9 10 11 12 13 14 15 16 17 18 19 20 21 22 23 24 25 26 27 28 29 30 31 |
... // 1 public void OnBeginDrag(PointerEventData eventData) { // If this script is disabled then do nothing! if (!enabled) return; // Otherwise fire the UnityEvent we assigned in the inspector for this event. OnDragStart.Invoke(); } // 2 public void OnDrag(PointerEventData eventData) { if (!enabled) return; // Feed the world position of the pointer to OnDragMove OnDragMove.Invoke(Camera.main.ScreenToWorldPoint((Vector3)eventData.position + Vector3.forward)); } // 3 public void OnDrop(PointerEventData eventData) { if (!enabled) return; OnDragReleased.Invoke(); } } |
- The
OnBeginDragmethod is the required method forIBeginDragHandler. This runs when the user starts to click and drag the game object this script is attached to. The method simply Invokes theOnDragStartevent which will be assigned in the inspector. - The
OnDragmethod is the required method forIDragHandler. This will run as the user holds down the pointer and moves around. It will InvokeOnDragMoveand pass through the world position of the pointer. This will be used to position the balloon as it is dragged around. - The
OnDropmethod is the required method forIDropHandler. This runs when the user releases the pointer click and simply InvokesOnDragReleasedwhich will be assigned in the inspector to activate the physics on the balloon so it will drop to the ground.
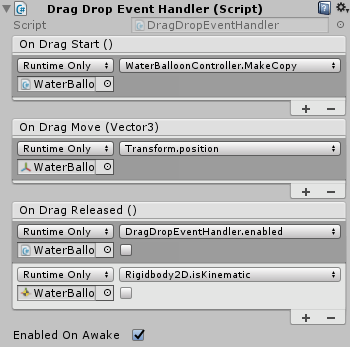
Add this script to the WaterBalloon game object and set up its events like so:
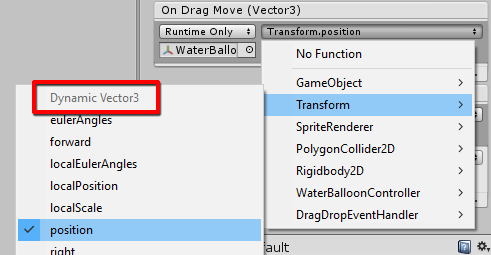
Important! When selecting the method to call for
OnDragMoveyou need to select from the Dynamic section of the dropdown menu. This ensures that the value passed via Invoke is sent to the Water baloon’sTransform.positionproperty.
When dragging starts a copy of the WaterBalloon game object is created by calling the WaterBalloonController.MakeCopy method. The copy stays in place of the existing one since the user is actually dragging the existing water balloon. When the drag is moving the world position of the pointer is passed into the transform of the water balloon which makes it follow the pointer. Finally, when the drag is released the DragDropEventHandler is disabled and the RigidBody2D component on the WaterBalloon is set to no longer be kinematic so that it will fall to the ground.
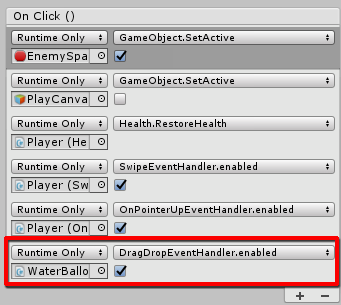
Once you have the DragDropEventHandler all set up on the WaterBalloon game object the last thing to do is to make sure it is enabled when the PlayButton is clicked and disabled when the player’s health is zero just like you’ve done with the other event handlers. The inspector for the PlayButton should look like this:
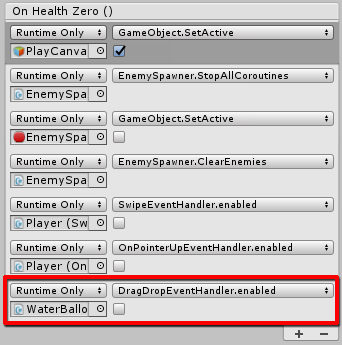
And the Player game object’s Health component should look like this:
Now you can press play and test out the new drag and drop functionality of the water balloon. Soak those snowmen and make them slip on the ice! Great job for making it this far! This is a lot of new information, but the code is in small chunks and everything is simple to set up in the inspector so that you can control logic without changing the code.
Which Method Should You Use?
 That’s a great question! The answer is… “It depends.” Ask yourself the following:
- Can you afford screen space for joystick buttons?
- Are the controls of your game too complex to directly interact with objects?
- Which method “feels” better?
When in doubt, try both methods and ask beta users. This tutorial has provided you with the basis of adding these controls to your game, but the actual input method chosen is often best left up to users. Some people are more comfortable with a gamepad and others are more comfortable with mouse and keyboard. It’s not that difficult to give the user the choice and oftentimes users love to have the option!
Where to Go from Here?
- Read more on Unity’s Event Systems and explore the various supported events.
- Explore the Event Trigger component more and try invoking other class methods with it.
You can download the complete project from here (snowballcannon_completed) to have a reference to check your work against.
As always, thanks for reading and don’t forget to subscribe for more awesome tutorials right to your inbox! If you have any questions or feedback just leave a comment down below!
![]()
[…] Implementing Touch Controls in Unity 3D […]
Very much appreciated. Thank you for this excellent article. Keep posting!