 With games we almost always need to save some data: scores, inventory, progress, preferences, etc. There are many ways to do this in Unity. In this article I’ll take you through a few different ways to save data and hopefully encourage some good habits when structuring your applications for saved data.
There are two main levels of persistency for data:
- Session Data (data doesn’t necessarily need to be remembered the next time you load up the application): This is usually done via static variables and is used for only values that matter for the current session. Most commonly this is for health, score, lives, active power-ups, etc.
- Application Data (data that must be remembered if the application is closed): This is done by saving data to a file or possibly a database on a server.
What often becomes confusing with Unity is that there are instances of classes that are disposed when a new scene is loaded. So if you have a GameObject with a PlayerData script attached to it, then when you load a new scene it with another GameObject with a PlayerData script, it is not the same instance of the first script. All of its values are set back to whatever was assigned in the inspector or script by default. So we need to make use of data persistence techniques.
When I design Unity applications I try to stick to the following rules:
- Is it an application preference (music volume, mute, skip tutorial messages)? If yes, then save using Unity’s PlayerPrefs class.
- Is it a value that must be available when we reload the application (player progress, inventory items, IAP)? If yes, then save to a file using some serialization method (binary, JSON, XML, etc).
- Otherwise it is likely only a variable that needs to be known throughout this session and can simply be stored in a static variable (Session Data).
Let’s take a look at these various methods and see how to implement them. I won’t be explaining the use of static variables to store session data because it is literally just having some class with public static variables that you set from other classes. The main disadvantage of this is that the use of these variables can be spread throughout your code, so try to use these sparingly.
Part I – PlayerPrefs
As inferred by the name of the class, these are the Player Preferences (not the person playing the game, but the Unity Player Application). As I mentioned earlier this should really be for storing things like music volume, should the app be muted, should we skip tutorial messages, quality settings (though if you use the application launcher then this is already managed by the Unity player). Let’s examine a simple use-case of this: muting all sounds and setting the master volume.
Scene Setup
To start, let’s setup our scene. The scene consists of a UI canvas with a panel, and that panel contains a slider for our volume setting and a toggle for our mute setting. I’ve also put in a button that reloads the scene and an AudioSource so that we can test the persistence of the settings. The AudioSource just plays a clip on awake and is set to looping. We can hear it restart when we reload the scene, but the volume or mute setting is automatically reapplied. Here’s a screenshot of all the important parts of the scene:
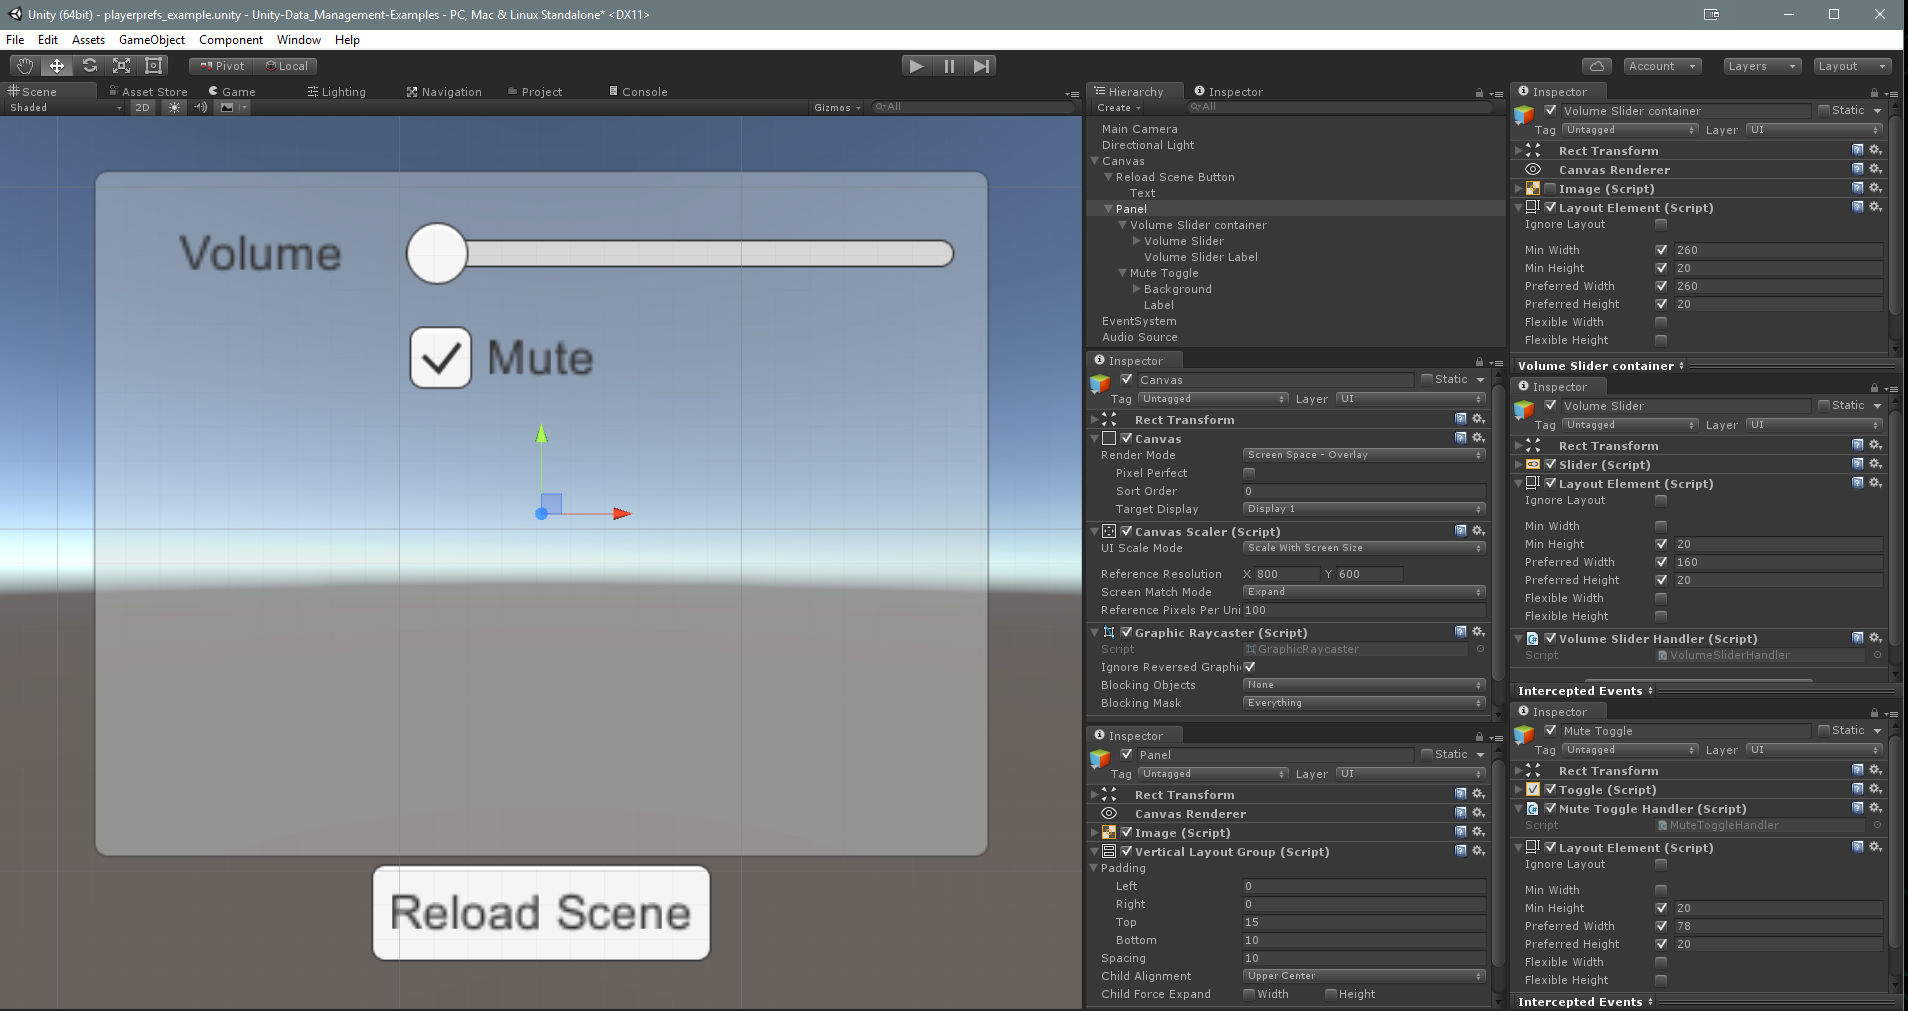
You may notice on the Volume Slider and the Mute Toggle that there are script components. We’ll get to those momentarily. First let’s talk about the class that handles the saving, loading, and applying of PlayerPrefs, the PlayerPrefsHandler .
PlayerPrefsHandler.cs
This class is responsible for saving, loading, and applying PlayerPrefs. The PlayerPrefs class is part of the Unity API. It has a bunch of handy static methods that can be used to save and restore data (integers, floats, and strings). Each preference is stored with a key, the key is a string that is used to look up a value. For example, for the mute setting I’ll be using a key, “mute” and for volume I’ll be using “volume”. The keys and their values actually get stored in either a file or in the Windows Registry (you can view them with regedit.exe, the Windows Registry Editor). So, they’re pretty accessible to your users and easy to modify. Therefore, they aren’t a good idea to use for sensitive data like scores, player stats, xp, etc. But they’re perfect for storing things like mute and volume settings. Unity also stores some data here like window dimensions and graphics quality level. I typically have a class like the PlayerPrefsHandler that deals with saving, loading, and applying all preferences. Even though this class is meant to handle all of this, oftentimes we’ll find ourselves accessing the preferences via other classes. You should try to avoid this, but in case you have to do it then it’s very important to keep all of the prefs keys in a single script and make them constant. This way you can use Intellisense to fill in the key’s variable name for you instead of trying (and failing) to remember the actual string. It also makes changing the key string easy because you only have to do it in one place. The code for this class is below and it is heavily commented so that you know what’s happening every step of the way:
|
1 2 3 4 5 6 7 8 9 10 11 12 13 14 15 16 17 18 19 20 21 22 23 24 25 26 27 28 29 30 31 32 33 34 35 36 37 38 39 40 41 42 43 44 45 46 47 48 49 50 51 52 53 54 55 56 57 58 59 60 61 62 63 64 65 66 67 68 69 70 71 72 73 74 75 76 77 78 79 80 81 82 83 84 |
using UnityEngine; /// <summary> /// Handles the saving, recalling, and applying of all PlayerPrefs for the application. /// </summary> public class PlayerPrefsHandler { /// <summary> /// Storing the PlayerPrefs keys in constants is a good practice! /// This saves you from having to make multiple changes in your code should you change the key value, /// allows you to make use of Intellisense for typing out the key (intead of mistyping the actual string), /// and since it is public and const you can access it anywhere without needing an instance of this class /// (i.e. by typing PlayerPrefsHandler.MUTE_INT). /// I like to append my PlayerPrefs keys with the type of the pref (i.e. _INT, _STR, _F) /// </summary> #region PlayerPrefs keys public const string MUTE_INT = "mute"; public const string VOLUME_F = "volume"; #endregion private const bool DEBUG_ON = true; /// <summary> /// This method should call all other methods that will apply saved or default preferences. /// We should call this as soon as possible when loading our application. /// </summary> public void RestorePreferences() { SetMuted(GetIsMuted()); SetVolume(GetVolume()); } /// <summary> /// Sets the AudioListener to be (un)muted and saves the value to player prefs. /// </summary> /// <param name="muted">Whether we should mute or not.</param> public void SetMuted(bool muted) { // Set the MUTE_INT key to 1 if muted, 0 if not muted PlayerPrefs.SetInt(MUTE_INT, muted ? 1 : 0); // Pausing the AudioListener will disable all sounds. AudioListener.pause = muted; if (DEBUG_ON) Debug.LogFormat("SetMuted({0})", muted); } /// <summary> /// Reads from PlayerPrefs to tell us if we should mute or not. /// </summary> /// <returns>Whether the MUTE_INT pref has been set to 1 or not.</returns> public bool GetIsMuted() { // If the value of the MUTE_INT key is 1 then sound is muted, otherwise it is not muted. // The default value of the MUTE_INT key is 0 (i.e. not muted). return PlayerPrefs.GetInt(MUTE_INT, 0) == 1; } /// <summary> /// Sets the volume on the AudioListener and saves the value to PlayerPrefs. /// </summary> /// <param name="volume">A value between 0 and 1</param> public void SetVolume(float volume) { // Prevent values less than 0 and greater than 1 from // being stored in the PlayerPrefs (AudioListener.volume expects a value between 0 and 1). volume = Mathf.Clamp(volume, 0, 1); PlayerPrefs.SetFloat(VOLUME_F, volume); AudioListener.volume = volume; } /// <summary> /// Retrieves the stored or default (1) volume from PlayerPrefs /// and ensures it is no less than 0 and no greater than 1 /// </summary> /// <returns>The volume setting between 0 and 1</returns> public float GetVolume() { return Mathf.Clamp(PlayerPrefs.GetFloat(VOLUME_F, 1), 0, 1); } } |
You may notice that this class does not inherit from MonoBehaviour. There’s really no reason to, and although this class is responsible for handling the player prefs it is actually loaded and ran from a different class which is a MonoBehaviour class. This class is called DataService.
DataService.cs
The DataService class is what is called a Singleton. A Singleton is basically a single instance of a class. Only one instance should ever exist. The Instance is accessed statically (i.e. DataService.Instance ) instead of by creating an instance and passing that reference around. They tend to make lie a lot easier and are used often in games. This Singleton is also derived from MonoBehaviour so it can be attached to a game object which makes it available to other game objects in the Hierarchy so we can assign onClick events and the like. Finally, the game object it is attached to is marked DontDestroyOnLoad , so that Unity will keep it when other scenes are loaded. Beware though! Singletons have gotten a bad name because they are often abused and referenced too frequently throughout code. When this happens the code isn’t extensible and modifications can be more time consuming later on. Singletons are also not easy to extend. You’ll want to use the conventional “Instance” member to access the subclass, but you that won’t give you access to any members of the subclass, just the parent class (not very helpful). So use them sparingly.
The code below is heavily commented as usual, but here’s a quick breakdown of what’s happening: Anytime the Instance is accessed the class will ensure that the Instance exists (it’s self-loading or lazy loading). When the MonoBehaviour Awake method is called we ensure that it is the one and only singleton in our scene. This allows us some leniency when we forget that we attached the singleton to an object in a scene (sometimes done during testing). If another instance of this class exists then it is destroyed. The Instance, though, is set as DontDestroyOnLoad, this makes it so that the game object it is attached to doesn’t get destroyed when a new scene is loaded and ensures we’re working with that initial and only instance.
In our Awake method is where we also create an instance of the PlayerPrefsHandler class and restore/apply the preferences that were saved. We also do this whenever another scene is loaded so that the preferences are applied to the new objects in the new scene (like muting the AudioListener).
|
1 2 3 4 5 6 7 8 9 10 11 12 13 14 15 16 17 18 19 20 21 22 23 24 25 26 27 28 29 30 31 32 33 34 35 36 37 38 39 40 41 42 43 44 45 46 47 48 49 50 51 52 53 54 55 56 57 58 59 60 61 62 63 64 65 66 67 68 69 70 71 |
using UnityEngine; namespace EX1 { /// <summary> /// Singleton - There should only ever be one DataService and it should persist /// between scene loads. /// This class is responsible for loading/saving data. /// </summary> public class DataService : MonoBehaviour { private static DataService _instance = null; public static DataService Instance { get { // If the instance of this class doesn't exist if (_instance == null) { // Check the scene for a Game Object with this class _instance = FindObjectOfType<DataService>(); // If none is found in the scene then create a new Game Object // and add this class to it. if (_instance == null) { GameObject go = new GameObject(typeof(DataService).ToString()); _instance = go.AddComponent<DataService>(); } } return _instance; } } public PlayerPrefsHandler prefs { get; private set; } // When the scene first runs ensure that there is only one // instance of this class. This allows us to add it to any scene and // not conflict with any pre-existing instance from a previous scene. private void Awake() { if (Instance != this) { Destroy(this); } else { DontDestroyOnLoad(gameObject); prefs = new PlayerPrefsHandler(); prefs.RestorePreferences(); // In Unity 5.4 OnLevelWasLoaded has been deprecated and the action // now occurs through this callback. #if UNITY_5_4_OR_NEWER SceneManager.sceneLoaded += OnLevelWasLoaded; #endif } } /// <summary> /// Ensure that the player preferences are applied to the new scene. /// </summary> // In Unity 5.4 OnLevelWasLoaded has been deprecated and the action // now occurs through 'SceneManager.sceneLoaded' callback. void OnLevelWasLoaded() { prefs.RestorePreferences(); } } } |
Note that this class is wrapped in a namespace (EX1). This is because I’m using the same class name in the second part of this tutorial and I don’t want them to conflict. Our next step will be to set up some UI elements to control our settings and then test it out.
UI Elements
Most often, the user will be making changes to settings like mute and volume via UI elements. In this tutorial we’re using a UI Toggle to control muting and a UI Slider to control volume. I’ve created a script for each of these controls that gets attached directly to the game object that has the correct UI component (i.e. one for toggle, one for slider). There’s no other setup needed in the inspector as these scripts automatically handle everything for us. I’ve commented the MuteToggleHandler class liberally, but not the VolumeSliderHandler since they only differ in one minor aspect. Both have a Start method that gets the appropriate component from the game object we’re attached to, then is uses the DataService.Instance to get access to an instance of the PlayerPrefs class and set the appropriate setting, and finally we set up a callback, or listener, to the UI control’s onValueChanged delegate. In the onValueChanged.AddListener method I’m inputting a parameter that is actually a method. It’s a special type of method called a lambda. This is used often in JavaScript and they come in really handy. Check out this link for more info. Simply attach the MuteToggleHandler class to the UI Toggle for muting and attach the VolumeSliderHandler to the UI Slider. The scripts do the rest!


|
1 2 3 4 5 6 7 8 9 10 11 12 13 14 15 16 17 18 19 20 21 22 23 24 25 26 27 28 29 30 31 32 33 34 35 36 37 38 |
using UnityEngine; using UnityEngine.UI; using DataService = EX1.DataService; // We'll switch to this in part 2 //using DataService = EX2.DataService; /// <summary> /// Handles the initial setting of the UI Toggle value /// and assigns the onValueChanged listener to the UI Toggle component. /// </summary> // RequireComponent ensures that when we can only add this component to a UI Toggle // It also ensures that when we attempt to GetComponent<Toggle> that it exists. [RequireComponent(typeof(Toggle))] public class MuteToggleHandler : MonoBehaviour { void Start() { // Get the reference to the attached toggle component. Toggle toggle = GetComponent<Toggle>(); // Set the initial value that was stored in player prefs. toggle.isOn = DataService.Instance.prefs.GetIsMuted(); // Set up the onValueChanged listener // This is done here instead of in the inspector for a few reasons: // - DataService contains the PlayerPrefsHandler reference and Unity won't let us // access that through the inspector. // - DataService is a singleton and may or may not be in the scene so we can't always // assign it to via the inspector. // - This makes the script completely self-contained. No other script needs access to this script. // The only fallback is that this class is not extensible, but it really doesn't need to be. toggle.onValueChanged.AddListener( (bool value) => { DataService.Instance.prefs.SetMuted(value); }); } } |
|
1 2 3 4 5 6 7 8 9 10 11 12 13 14 15 16 17 18 19 20 |
using UnityEngine; using UnityEngine.UI; using DataService = EX1.DataService; // We'll switch to this in part 2 //using DataService = EX2.DataService; [RequireComponent(typeof(Slider))] public class VolumeSliderHandler : MonoBehaviour { void Start() { Slider slider = GetComponent<Slider>(); slider.value = DataService.Instance.prefs.GetVolume(); slider.onValueChanged.AddListener( (float value) => { DataService.Instance.prefs.SetVolume(value); }); } } |
As you can see from the VolumeSliderHandler class, these two scripts are quite short and simple. As the values of the controls are changed the player prefs are saved. Sweet!
You can test this out now if you like. I’d suggest adding an AudioSource in your scene so you can hear the effect of the changes and reload the scene to test out that the saving of the settings is persistent between runs of the application as well as levels. In my project I set up a button that reloads the current level, that part is optional, but it’s easy to do and is good practice.
ClearPlayerPrefs.cs
There’s one last part to all of this, the ClearPlayerPrefs class. I use this script in every project I have. It’s super simple, but really handy when testing things out. It just clears the PlayerPrefs file/registry entries. Perfect for when you mess things up 🙂 . This script is an Editor script and must go into a folder named “Editor”. This tells Unity that it shouldn’t be included in the build and that it is only modifying the Unity Editor. It actually adds a menu item to the Edit menu. Super handy.
|
1 2 3 4 5 6 7 8 9 10 11 |
using UnityEngine; using UnityEditor; public class ClearPlayerPrefs : Editor { [MenuItem("Edit/Clear All PlayerPrefs")] static void ClearAll() { PlayerPrefs.DeleteAll(); } } |
That’s really it for handling player preferences. There are a few classes involved, but with this sort of structure you should rarely go wrong. The only issue here is that PlayerPrefs is not really a good place to store data that you want to prevent players from modifying, like save files.
Part II – Data Serialization
We often save our data to files for a variety of factors. PlayerPrefs is a widely know location and easy to tinker with. In the case of Windows machines, you have limits on how much data can be stored in a registry entry. Also, during development it is often easier for the devs to examine a file with an easy-to-read format (like JSON or XML) then we turn on encryption before we release the game. So PlayerPrefs just doesn’t tend to cut it.
In the example here I will be using JSON (pronounced JAY-son) serialization to store save data. I won’t be diving into any encryption methods as they’re beyond the scope of this tutorial (and there are tons of tutorials out there on the subject). JSON is a highly popular format. It’s relatively easy for a human to read, it is frequently used for data transfer over the internet, and Unity’s API now contains a utility to (de)serialize JSON strings.
Serialization takes the public variables in a class and writes them to a format like JSON. For example, if you had a class like this:
|
1 2 3 4 |
public ForSerial { public int myInt = 10; } |
It’s JSON representation would be the variable name followed by it’s value like so:
|
1 |
{"myInt" : 10} |
The awesome thing about this is that it can be read right back into the class’s variables. Very cool (I wish I had understood this when making my first game!). Just about every programming language has a library that will serialize and deserialize JSON. So you could send this data up to your server and read it with PHP, or send it to a Java app and read it there with relative ease. It is used very commonly in REST APIs which are everywhere (Twitter, Facebook, Google APIs, etc)! So learn how to deal with JSON objects. You’ll find them everywhere.
SaveData.cs
![]() We begin with our class that will store the player’s progress and stats. This is the class that we will serialize and write to file. It will store the number of coins, health, lives, power ups, and the last level (scene) the player was in. It is responsible for being able to save an instance of itself to a file via the
WriteToFile() method. It has a static method that can create a new instance of the SaveData class from a file (or a default instance if the file doesn’t exist). It also has a method to check if an instance has only the default values (i.e. nothing has been written to it yet). And finally, a
ToString() method so that we can get a human-friendly string representation of the instance when we need it.
We begin with our class that will store the player’s progress and stats. This is the class that we will serialize and write to file. It will store the number of coins, health, lives, power ups, and the last level (scene) the player was in. It is responsible for being able to save an instance of itself to a file via the
WriteToFile() method. It has a static method that can create a new instance of the SaveData class from a file (or a default instance if the file doesn’t exist). It also has a method to check if an instance has only the default values (i.e. nothing has been written to it yet). And finally, a
ToString() method so that we can get a human-friendly string representation of the instance when we need it.
For saving and loading the file I am using the simplest methods available: File.WriteAllText() and File.ReadAllText() . These are part of the System.IO namespace and just blankly read the entire contents of a file to a string or write a single string to a file. To (de)serialize the class to a JSON object I’m making use of Unity’s built-in JsonUtility class.
The code is quite short and the majority of the code is dealing with default values for the class. I’ve commented it up for you to get a better understanding.
|
1 2 3 4 5 6 7 8 9 10 11 12 13 14 15 16 17 18 19 20 21 22 23 24 25 26 27 28 29 30 31 32 33 34 35 36 37 38 39 40 41 42 43 44 45 46 47 48 49 50 51 52 53 54 55 56 57 58 59 60 61 62 63 64 65 66 67 68 69 70 71 72 73 74 75 76 77 78 79 80 81 82 83 84 85 86 87 88 89 90 91 92 93 94 95 96 97 98 99 100 101 102 103 104 105 106 107 108 109 110 111 112 113 114 115 116 117 118 119 120 121 122 |
using UnityEngine; using System.IO; // Required fro reading/writing to files. using System.Collections.Generic; // Used for Lists /// <summary> /// The different types of powerups a player can have. /// </summary> public enum PowerUp { Fireballs, DoubleJump } /// <summary> /// Responsible for: /// - Maintaining the stats for a player and their progress /// - Writing this data to a file. /// - Reading this data from a file. /// </summary> public class SaveData { #region Defaults public const string DEFAULT_LEVEL = "level1"; private const int DEFAULT_COINS = 0; private const int DEFAULT_HEALTH = 100; private const int DEFAULT_LIVES = 3; #endregion // We initialize all of the stats to be default values. public int coins = DEFAULT_COINS; public int health = DEFAULT_HEALTH; public int lives = DEFAULT_LIVES; public List<PowerUp> powerUps = new List<PowerUp>(); public string lastLevel = DEFAULT_LEVEL; const bool DEBUG_ON = true; /// <summary> /// Writes the instance of this class to the specified file in JSON format. /// </summary> /// <param name="filePath">The file name and full path to write to.</param> public void WriteToFile(string filePath) { // Convert the instance ('this') of this class to a JSON string with "pretty print" (nice indenting). string json = JsonUtility.ToJson(this, true); // Write that JSON string to the specified file. File.WriteAllText(filePath, json); // Tell us what we just wrote if DEBUG_ON is on. if (DEBUG_ON) Debug.LogFormat("WriteToFile({0}) -- data:\n{1}", filePath, json); } /// <summary> /// Returns a new SaveData object read from the data in the specified file. /// </summary> /// <param name="filePath">The file to attempt to read from.</param> public static SaveData ReadFromFile(string filePath) { // If the file doesn't exist then just return the default object. if (!File.Exists(filePath)) { Debug.LogErrorFormat("ReadFromFile({0}) -- file not found, returning new object", filePath); return new SaveData(); } else { // If the file does exist then read the entire file to a string. string contents = File.ReadAllText(filePath); // If debug is on then tell us the file we read and its contents. if (DEBUG_ON) Debug.LogFormat("ReadFromFile({0})\ncontents:\n{1}", filePath, contents); // If it happens that the file is somehow empty then tell us and return a new SaveData object. if (string.IsNullOrEmpty(contents)) { Debug.LogErrorFormat("File: '{0}' is empty. Returning default SaveData"); return new SaveData(); } // Otherwise we can just use JsonUtility to convert the string to a new SaveData object. return JsonUtility.FromJson<SaveData>(contents); } } /// <summary> /// This is used to check if the SaveData object is the same as the default. /// i.e. it hasn't been written to yet. /// </summary> public bool IsDefault() { return ( coins == DEFAULT_COINS && health == DEFAULT_HEALTH && lives == DEFAULT_LIVES && lastLevel == DEFAULT_LEVEL && powerUps.Count == 0); } /// <summary> /// A friendly string representation of this object. /// </summary> public override string ToString() { string[] powerUpsStrings = new string[powerUps.Count]; for (int i = 0; i < powerUps.Count; i++) { powerUpsStrings[i] = powerUps[i].ToString(); } return string.Format( "coins: {0}\nhealth: {1}\nlives: {2}\npowerUps: {3}\nlastLevel: {4}", coins, health, lives, "[" + string.Join(",", powerUpsStrings) + "]", lastLevel ); } } |
Next up we’ll integrate this into our DataService class.
DataService.cs (EX2)
In the second part of our DataService class we’ll want to make it responsible for handling the loading and saving of our player data files. Also, it’s a bit boring to have a single save data file. Most games allow us to have multiple save file slots, so we’ll set that up too.
The new code (added on to the original DataService class) starts in the OnLevelWasLoaded method where the comments start. Take a look a the code for a moment then read on for some further explanation.
|
1 2 3 4 5 6 7 8 9 10 11 12 13 14 15 16 17 18 19 20 21 22 23 24 25 26 27 28 29 30 31 32 33 34 35 36 37 38 39 40 41 42 43 44 45 46 47 48 49 50 51 52 53 54 55 56 57 58 59 60 61 62 63 64 65 66 67 68 69 70 71 72 73 74 75 76 77 78 79 80 81 82 83 84 85 86 87 88 89 90 91 92 93 94 95 96 97 98 99 100 101 102 103 104 105 106 107 108 109 110 111 112 113 114 115 116 117 118 119 120 121 122 123 124 125 126 127 128 129 130 131 132 133 134 135 136 137 138 139 140 141 142 143 144 145 146 147 148 149 150 151 152 153 154 155 156 157 158 159 160 161 162 163 164 165 166 167 168 169 170 171 172 173 174 175 176 177 178 179 180 181 182 183 184 185 186 187 188 189 190 191 192 193 194 195 196 197 198 199 200 201 202 203 204 205 206 207 208 209 210 211 212 213 214 215 216 217 218 219 220 221 222 |
using UnityEngine; using System.IO; using UnityEngine.SceneManagement; namespace EX2 { /// <summary> /// This class is responsible for loading/saving data. /// </summary> public class DataService : MonoBehaviour { private static DataService _instance = null; public static DataService Instance { get { if (_instance == null) { _instance = FindObjectOfType<DataService>(); if (_instance == null) { GameObject go = new GameObject(typeof(DataService).ToString()); _instance = go.AddComponent<DataService>(); } } return _instance; } } public PlayerPrefsHandler prefs { get; private set; } private void Awake() { if (Instance != this) { Destroy(this); } else { DontDestroyOnLoad(gameObject); prefs = new PlayerPrefsHandler(); prefs.RestorePreferences(); #if UNITY_5_4_OR_NEWER SceneManager.sceneLoaded += OnLevelWasLoaded; #endif } } void OnLevelWasLoaded(Scene scene, LoadSceneMode mode) { OnLevelWasLoaded(); } void OnLevelWasLoaded() { prefs.RestorePreferences(); // If we haven't loaded any SaveData yet then load it. // This also sets the currentProfile number. if (SaveData == null) LoadSaveData(); // Set the player's progress if this is not the main menu scene. // In my project this is scene 0 and scene 1 Scene activeScene = SceneManager.GetActiveScene(); if (activeScene.buildIndex > 1) { SaveData.lastLevel = activeScene.path.Replace("Assets/", "").Replace(".unity", ""); } // Write the save data to file, saving the player's stats and progress. WriteSaveData(); } /// <summary> /// The currently loaded Save Data. /// </summary> public SaveData SaveData { get; private set; } /// <summary> /// Use this to prevent reloading the data when a new scene loads. /// </summary> bool isDataLoaded = false; /// <summary> /// Store the currently loaded profile number here. /// </summary> public int currentlyLoadedProfileNumber { get; private set; } /// <summary> /// The maximum number of profiles we'll allow our users to have. /// </summary> public const int MAX_NUMBER_OF_PROFILES = 3; /// <summary> /// Loads the save data for a specific profile number. /// This will eventually be called from a button. /// </summary> /// <param name="profileNumber">(Optional) the profile number to load, /// omit to automatically load the first profile found.</param> public void LoadSaveData(int profileNumber = 0) { if (isDataLoaded && profileNumber == currentlyLoadedProfileNumber) return; // Automatically load the first available profile. if (profileNumber <= 0) { // We iterate through the possible profile numbers in case one with a lower number // no longer exists. for (int i = 1; i <= MAX_NUMBER_OF_PROFILES; i++) { if (File.Exists(GetSaveDataFilePath(i))) { // Once the file is found, load it from the calculated file name. SaveData = SaveData.ReadFromFile(GetSaveDataFilePath(i)); // And set the current profile number for later use when we save. currentlyLoadedProfileNumber = i; break; } } } else { // If the profileNumber parameter is supplied then we'll look to see if that exists. if (File.Exists(GetSaveDataFilePath(profileNumber))) { // If the file exists then load the SaveData from the calculated file name. SaveData = SaveData.ReadFromFile(GetSaveDataFilePath(profileNumber)); } else { // Otherwise just return a new SaveData = new SaveData(); } // And set the current profile number for later use when we save. currentlyLoadedProfileNumber = profileNumber; } } /// <summary> /// The base name of our save data files. /// </summary> private const string SAVE_DATA_FILE_NAME_BASE = "savedata"; /// <summary> /// The extension of our save data files. /// </summary> private const string SAVE_DATA_FILE_EXTENSION = ".txt"; /// <summary> /// The directory our save data files will be stored in. /// This is done through a getter because we're calling to a non-constant member (Application.dataPath) /// to construct this. /// </summary> private string SAVE_DATA_DIRECTORY { get { return Application.dataPath + "/saves/"; } } /// <summary> /// The full path and file name for our SaveData file. /// ex: 'c:\projectdirectory\assets\saves\savedata1.txt' /// </summary> /// <param name="profileNumber">The number profile to load (must be greater than 0).</param> public string GetSaveDataFilePath(int profileNumber) { // If the profile number is less than 1 then throw an exception. if (profileNumber < 1) throw new System.ArgumentException("profileNumber must be greater than 1. Was: " + profileNumber); // Ensure that the directory exists. if (!Directory.Exists(SAVE_DATA_DIRECTORY)) Directory.CreateDirectory(SAVE_DATA_DIRECTORY); // Construct the string representation of the directory + file name. return SAVE_DATA_DIRECTORY + SAVE_DATA_FILE_NAME_BASE + profileNumber.ToString() + SAVE_DATA_FILE_EXTENSION; } /// <summary> /// Writes the save data to file. /// </summary> public void WriteSaveData() { // If for some accidental reason we forgot to assign a profile number, // then check to see if there is any unused profile number (i.e. a file doesn't exist for it). if (currentlyLoadedProfileNumber <= 0) { for (int i = 1; i <= MAX_NUMBER_OF_PROFILES; i++) { if (!File.Exists(GetSaveDataFilePath(i))) { currentlyLoadedProfileNumber = i; break; } } } // If we couldn't find an empty profile then throw an exception because something went very wrong. if (currentlyLoadedProfileNumber <= 0) { throw new System.Exception("Cannot WriteSaveData. No available profiles and currentlyLoadedProfile = 0"); } else { // Otherwise save the SaveData to file. // If the save data doesn't exist yet, // then create a new default save data. if (SaveData == null) SaveData = new SaveData(); // Finally save it to th file using the constructed path + file name SaveData.WriteToFile(GetSaveDataFilePath(currentlyLoadedProfileNumber)); } } } } |
The first additions we have are in the OnLevelWasLoaded method. This method is called every time a scene is loaded. It ensures that we have a SaveData object loaded into memory and it then ensures it is written to file. This way when a new scene is loaded the SaveData is automatically saved to a file. Oftentimes we may also want to WriteSaveData when the player reaches a checkpoint, level end, or some other meaningful time in our games.
The LoadSaveData method has an optional parameter (profile number). If we don’t use this parameter then the method will look for the first existing save data file and load it. If we do use the parameter then we will load the data from file if the file exists. If the file doesn’t exist we simply create a new SaveData object. In all cases we set the currentlyLoadedProfileNumber so that we can reference it later when saving the SaveData object to file.
Next up are some constants (and a getter) that will help us construct the full path and file name of the save data file. That full path is constructed via the GetSaveDataFilePath method which expects a parameter indicating the profile number to load. This method simply ensures the directory exists and returns that constructed file path and file name.
Finally, we have the WriteSaveData method. This first attempts to ensure that we have a valid profileNumber and will write the file to disk.
Since DataService is a singleton we can call any of these methods without creating a new instance of the class or using something like GameObject.FindObjectOfType . All we have to do is type something like this: DataService.Instance.WriteSaveData() and we’re good to go.
When you save the data it will go into a directory called “saves” that’s in your Asset folder (you might need to refresh the project window for it to show up). You should examine the contents of those files as changes happen. Since we’re saving them with a txt extension, Unity will show the contents in the inspector window (you may need to refresh the Project window). The contents should look like this:
|
1 2 3 4 5 6 7 8 9 10 |
{ "coins": 0, "health": 100, "lives": 3, "powerUps": [ 0, 1 ], "lastLevel": "level1" } |
Next up we’re going to add a class to handle loading of the profiles from buttons.
SaveSlotButtonHandler.cs
We’ll use LoadSaveData on some buttons to load a profile and start a level with this next bit of code. First, simply add 3 buttons to your scene. Then add this class to your project:
|
1 2 3 4 5 6 7 8 9 10 11 12 13 14 15 16 17 18 19 20 21 22 23 24 25 26 27 28 29 30 31 32 33 34 35 36 37 38 39 40 41 42 43 44 45 46 47 48 49 50 51 52 53 54 55 56 57 58 59 60 61 62 63 64 65 66 67 68 69 70 71 72 73 74 |
using UnityEngine; using UnityEngine.UI; using System.IO; using UnityEngine.SceneManagement; using EX2; /// <summary> /// Attach this to any game object. I like to attach it to the canvas containing the buttons that will /// load profiles. That way it's in a 'logical' place and easy to find. /// </summary> public class SaveSlotButtonHandler : MonoBehaviour { /// <summary> /// Assign each of the button labels here. They should be in order of their appearance (top to bottom). /// </summary> public Text[] buttonLabels; /// <summary> /// This is the text that will display when /// </summary> private const string EMPTY_SLOT = "New Game"; private const string USED_SLOT = "Load Save "; void Start() { SetButtonLabels(); } /// <summary> /// Sets the label on each button to indicate whether we're loading an empty slot or /// loading an actual profile. /// </summary> void SetButtonLabels() { if (buttonLabels.Length != DataService.MAX_NUMBER_OF_PROFILES) { Debug.LogError( "Incorrect number of button labels. Must be exactly " + DataService.MAX_NUMBER_OF_PROFILES); } else { // For every possible profile number. for (int i = 0; i < DataService.MAX_NUMBER_OF_PROFILES; i++) { // If the profile file exists, // Then set the label to say the profile exists (i.e. 'Load Save 1') if (File.Exists(DataService.Instance.GetSaveDataFilePath(i + 1))) { buttonLabels[i].text = USED_SLOT + (i + 1).ToString(); } else { // Otherwise set the label to just say 'New Game" indicating it is an empty slot. buttonLabels[i].text = EMPTY_SLOT; } } } } // This should be assigned to each button via the inspector. // The parameter in the inspector's on click event will be 1,2, or 3 /// <summary> /// Called from the OnClick methods for buttons. /// </summary> /// <param name="profileNumber"></param> public void LoadGame(int profileNumber) { // Load the save data file DataService.Instance.LoadSaveData(profileNumber); // Load the last level the player was in SceneManager.LoadScene(DataService.Instance.SaveData.lastLevel); } } |
The code is commented heavily and there’s really nothing to explain outside of the comments other than what was explained above. The next thing we’ll want to do is set up some way to test our SaveData.
TestSaveData.cs
 This class’s sole purpose is to just test out our save data file. It will allow us to view the currently loaded SaveData object instance and press some keyboard keys to give the player coins, give/take health, give/take lives, give/take power ups, and load the next level. You should also examine the contents of the savedata{n}.txt files to see that when they change on disk (hint: When is WriteToFile running during the application?).
|
1 2 3 4 5 6 7 8 9 10 11 12 13 14 15 16 17 18 19 20 21 22 23 24 25 26 27 28 29 30 31 32 33 34 35 36 37 38 39 40 41 42 43 44 45 46 47 48 49 50 51 52 53 54 55 56 57 58 59 60 61 62 63 64 65 66 67 68 69 70 71 72 73 74 75 76 77 78 79 80 81 82 83 84 85 86 87 88 89 90 91 92 93 94 95 96 97 98 99 100 101 102 103 |
using UnityEngine; using UnityEngine.SceneManagement; using EX2; public class TestSaveData : MonoBehaviour { private static TestSaveData _instance; void Awake() { // Making this object persist through the scenes so I only have to add it to one. if (_instance == null) { gameObject.name = "[TSD instance]"; DontDestroyOnLoad(gameObject); _instance = this; } if (this != _instance) Destroy(gameObject); } void Update() { if (DataService.Instance.SaveData == null) return; if (Input.GetKeyDown(KeyCode.Alpha1)) DataService.Instance.SaveData.coins++; if (Input.GetKeyDown(KeyCode.Alpha2)) DataService.Instance.SaveData.coins--; if (Input.GetKeyDown(KeyCode.Q)) DataService.Instance.SaveData.health++; if (Input.GetKeyDown(KeyCode.W)) DataService.Instance.SaveData.health--; if (Input.GetKeyDown(KeyCode.A)) DataService.Instance.SaveData.lives++; if (Input.GetKeyDown(KeyCode.S)) DataService.Instance.SaveData.lives--; if (Input.GetKeyDown(KeyCode.F)) { if (DataService.Instance.SaveData.powerUps.Contains(PowerUp.Fireballs)) DataService.Instance.SaveData.powerUps.Remove(PowerUp.Fireballs); else DataService.Instance.SaveData.powerUps.Add(PowerUp.Fireballs); } if (Input.GetKeyDown(KeyCode.D)) { if (DataService.Instance.SaveData.powerUps.Contains(PowerUp.DoubleJump)) DataService.Instance.SaveData.powerUps.Remove(PowerUp.DoubleJump); else DataService.Instance.SaveData.powerUps.Add(PowerUp.DoubleJump); } if (Input.GetKeyDown(KeyCode.Return)) { DataService.Instance.WriteSaveData(); } if (Input.GetKeyDown(KeyCode.Space)) { int currentSceneIndex = SceneManager.GetActiveScene().buildIndex; SceneManager.LoadScene(currentSceneIndex + 1); } if (Input.GetKeyDown(KeyCode.M)) SceneManager.LoadScene(1); } void OnGUI() { string saveData = "NOT LOADED YET"; if (DataService.Instance.SaveData != null) saveData = DataService.Instance.SaveData.ToString(); string debug = string.Format( "Currently Loaded Profile number: {0}\n" + "SaveData: \n{1}\n\n" + "Press 1/2 to inc/dec coins\n" + "Press Q/W to inc/dec health\n" + "Press A/S to inc/dec life\n" + "Press F to add/remove Fireballs powerup\n" + "Press D to add/remove DoubleJump powerup\n" + "Press ENTER to save\n" + "Press SPACE to load next level\n" + "Press M for menu", DataService.Instance.currentlyLoadedProfileNumber, saveData ); GUI.Label(new Rect(0, 0, Screen.width, Screen.height), debug); } } |
After you’ve added all of this code to your project, test it out by following the on-screen instructions provided by TestSaveData.cs. Examine the changes to the save files, get a feel for when and how the data is loaded. And most of all, enjoy the magic of (de)serialization!
Next Steps
 Now that you’ve had an introduction on saving data to file with JSON, take a look at some other serialization methods like .NET’s BinaryWriter or XmlSerializer. Neither is as neat and easy to use as a Unity’s Json Utility, but they have their merits. BinaryWriter will be harder for end-users to tinker with, it is the most compact, and the easiest to encrypt, but it is the most difficult to transfer to other applications. XML is probably the easiest for a human to read, easy to transfer between applications, but it is the least compact and most complex to write code for. JSON is a good middle-of the road serialization method. It’s not too hard for a human to read, it’s fairly compact, it’s not too difficult to encrypt, and it is easily read by other applications. I’d also suggest exploring some JSON readers such as JSON Reader for Notepad++. Spend some time playing around with each of these methods to get a feel for them.
You can get the full project with source from this repository on Github:
https://github.com/Naphier/Unity-Data_Management-Examples/releases/tag/v1.0
If you’re interested in diving deeper and need some one-on-one help, give me a shout! I’m a Unity Certified Developer and I give private lessons in a variety of programming topics.
As always, thanks for reading and don’t forget to subscribe to my email list to hear about new blog posts!
![]()
Hello Sean:
Thanks for sharing your article, it explains this topic very well and clear, help me a lot. i’m following it now. I got a little problem when i got to the DataService.cs part, within the Awake() function ,
private void Awake()
{
////this line is needed
SceneManager.sceneLoaded += OnLevelWasLoaded;
}
}
void OnLevelWasLoaded()
{
prefs.RestorePreference();
}
if i followed you here exactly the same, i will got error, it said “No overload for OnLevelWasLoaded matches delegate UnityAction “, so i have to add two parameters to OnLevelWasLoaded function as signature to make it work. it became:
void OnLevelWasLoaded(Scene scene, LoadSceneMode mode)
{
prefs.RestorePreference();
}
I’m not sure this happened it is because my unity is ver5.5 and i want to know if those two extra parameters will cause problem in the future? thanks for your work again.
Excellent catch, thank you! The article will be updated. I think I was trying to make it “universal” and forgot about the required parameters on that callback. Good catch! And no, those parameters should be OK in future versions of Unity (unless they decided to change) and they do not need to be used.
Thank you for your answer, have a nice day!
Hello Sean:
I just got to the final of your tutorial, it is a excellent tutorial, i learnt a lot useful stuff from it. i followed your guild and everything work fine, except one part: the powerups part in save file. after i wrote the data to the file , i found that the data of save file is :
{
“conis”: 0,
“health”: 100,
“lives”: 3,
“powerUps”: [], // the powerups part is missing!
“lastLevel”: “Level1”
}
then i run the test file, the outcome is :
{
“conis”: 20,
“health”: 115,
“lives”: 11,
“powerUps”: [], //powerup part still didn’t work.
“lastLevel”: “Level1”
}
that means everything works just fine except the powerUps part. then i examined the SaveData.cs, the part:
public override string ToString()
{
string[] powerUpsStrings = new string[powerUps.Count];
for (int i = 0; i < powerUps.Count; i++)
{
powerUpsStrings[i] = powerUps[i].ToString();
}
return string.Format(
"coins: {0}\nhealth: {1}\nlives: {2}\npowerUps: {3}\nlastLevel: {4}",
conis,
health,
lives,
"[" + string.Join(",", powerUpsStrings) + "]",
lastLevel
);
}
everything looks fine for me. i even copied the whole script from your article, but the problem is still there. that is a weird problem, at my point of view. do you have any idea about this problem? thank you for your time.
Hi Ben,
It looks like either your powerUps list is not getting serialized or there is nothing in it when it gets serialized. Did you write out the TestSaveData class? Did you actually add powerUps via the GUI input (F or D key)? Do the powerUps show in the OnGUI display? Can you manually add powerups to the JSON file and are they read in correctly? As you can see none of this really has to do with ToString which just provides a nicely formatted way to debug the class. If your ToString method is showing an empty array for powerups then there’s nothing in the array (i.e. there’s nothing been added). If it’s still not storing after all of those checks then it may be an issue with Unity’s JSON Utllity which I was just using yesterday and tends to not do nested types well, but it should be doing this list of powerups just fine. If it does end up being JSON Utility then check out part 2 of this article: Twitter REST API, it uses NewtonSoft’s JSON utility which is a lot better.
Hi Sean:
i just restart my PC and checked again. it’s weired that the default value of powerUps is still empty, like this:
“powerUps”: []
(the default outcome shoul be
“powerUps”: [
1,
0
],
isn’t it? like the example you gave)
but i can add values to it via F/D key. it shows:
“powerUps”: [
1,
0
],
it looks like the enum powerUps is not getting serialized or something at very first for some reason, i guess.it works well after the values being added. the default part still have a little problem, but it looks like is not a big deal for now. i will try to figure it out sometime. thank you for your advices and work. have a nice day!
Thanks Sean. Your article has answered many questions for me this morning..! Can I confirm your approach is still valid for Unity 2018.2..?
Yes, this is fundamental stuff and does not make use of features that typically change between Unity versions.
Many thanks for this article, well written & easy to follow.
Glad it’s helpful!
Very much appreciated. Thank you for this excellent article. Keep posting!