Hi everyone!
One of the awesome things about Unity is you can customize the editor to add all sorts of cool functionality. This article will show you how to override Unity’s transform inspector with a more useful customized version. The Custom Transform Component includes:
- The ability to view and edit the quaternion rotation (nice for experimenting and learning how quaternions work).
- The ability to show the local axes in the Scene view even when the object is not selected.
- Some special operations for aligning to other objects, random rotation, random scale, and random position.
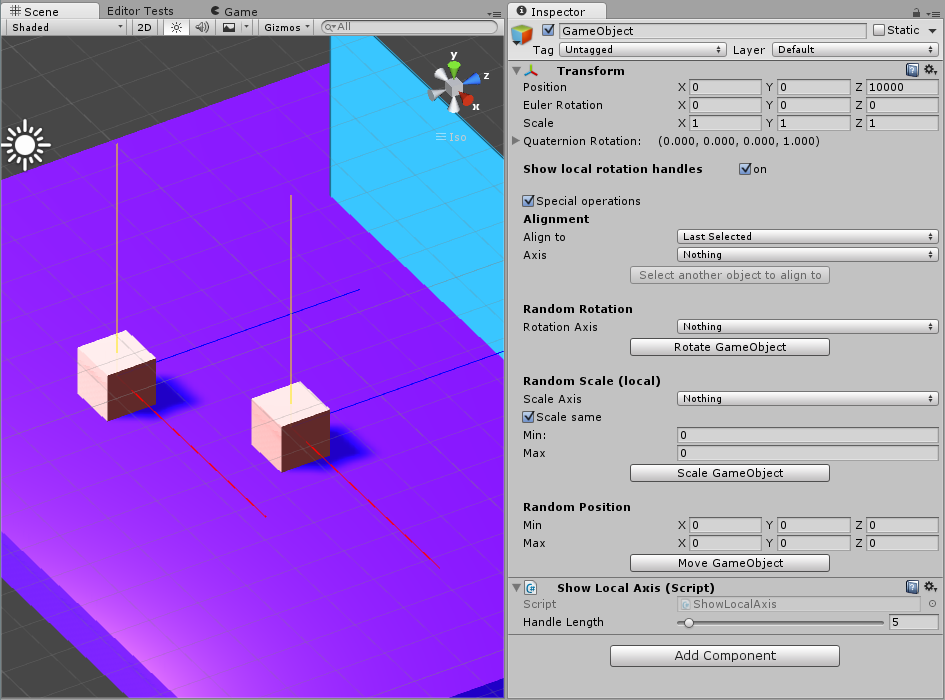
Here’s what the final product will look like:
Part I: Extending the Default Transform Inspector
Overriding the Defaults
- Custom inspector scripts need to inherit from Unity’s Editor class.
- To indicate what component (in our case the Transform component) the custom editor is for we will use the CustomEditor attribute.
- Very commonly, you’ll want to be able to select multiple items simultaneously and edit them. For this you’ll need to add the CanEditMultpleObjects attribute. There are some caveats to this and you may need to write your own methods to apply changes to all selected objects as in the example below.
The first part of our class will basically recreate Unity’s transform component. Unity draws the inspector in the method OnInspectorGUI() we will override this to make our custom inspector. Now, you don’t need to recreate the default inspector (the part that shows position, rotation, and scale). I’m doing it here to give you insight on how custom editors work, If you just want to use Unity’s default then you can call base.OnInspectorGUI() from your override of OnInspetorGUI(). As you may see from the extents of the code below, that may be your preferred option.
|
1 2 3 4 5 6 7 8 9 10 11 12 13 14 15 16 17 18 19 20 21 22 23 24 25 26 27 28 29 30 31 32 33 34 35 36 37 38 39 40 41 42 43 44 45 46 47 48 49 50 51 52 53 54 55 56 57 58 59 60 61 62 63 64 65 66 67 68 69 70 71 72 73 74 75 76 77 78 79 80 81 82 83 84 85 86 87 88 89 90 91 92 93 94 95 96 97 98 99 100 101 102 103 104 105 106 107 108 109 110 111 |
using UnityEngine; using UnityEditor; [CustomEditor(typeof(Transform))] [CanEditMultipleObjects] public class CustomTransformComponent : Editor { private Transform _transform; public override void OnInspectorGUI() { //We need this for all OnInspectorGUI sub methods _transform = (Transform)target; StandardTransformInspector(); } private void StandardTransformInspector() { bool didPositionChange = false; bool didRotationChange = false; bool didScaleChange = false; // Watch for changes. // 1) Float values are imprecise, so floating point error may cause changes // when you've not actually made a change. // 2) This allows us to also record an undo point properly since we're only // recording when something has changed. // Store current values for checking later Vector3 initialLocalPosition = _transform.localPosition; Vector3 initialLocalEuler = _transform.localEulerAngles; Vector3 initialLocalScale = _transform.localScale; EditorGUI.BeginChangeCheck(); Vector3 localPosition = EditorGUILayout.Vector3Field("Position", _transform.localPosition); if (EditorGUI.EndChangeCheck()) didPositionChange = true; EditorGUI.BeginChangeCheck(); Vector3 localEulerAngles = EditorGUILayout.Vector3Field("Euler Rotation", _transform.localEulerAngles); if (EditorGUI.EndChangeCheck()) didRotationChange = true; EditorGUI.BeginChangeCheck(); Vector3 localScale = EditorGUILayout.Vector3Field("Scale", _transform.localScale); if (EditorGUI.EndChangeCheck()) didScaleChange = true; // Apply changes with record undo if (didPositionChange || didRotationChange || didScaleChange) { Undo.RecordObject(_transform, _transform.name); if (didPositionChange) _transform.localPosition = localPosition; if (didRotationChange) _transform.localEulerAngles = localEulerAngles; if (didScaleChange) _transform.localScale = localScale; } // Since BeginChangeCheck only works on the selected object // we need to manually apply transform changes to all selected objects. Transform[] selectedTransforms = Selection.transforms; if (selectedTransforms.Length > 1) { foreach (var item in selectedTransforms) { if (didPositionChange || didRotationChange || didScaleChange) Undo.RecordObject(item, item.name); if (didPositionChange) { item.localPosition = ApplyChangesOnly( item.localPosition, initialLocalPosition, _transform.localPosition); } if (didRotationChange) { item.localEulerAngles = ApplyChangesOnly( item.localEulerAngles, initialLocalEuler, _transform.localEulerAngles); } if (didScaleChange) { item.localScale = ApplyChangesOnly( item.localScale, initialLocalScale, _transform.localScale); } } } } private Vector3 ApplyChangesOnly(Vector3 toApply, Vector3 initial, Vector3 changed) { if (!Mathf.Approximately(initial.x, changed.x)) toApply.x = _transform.localPosition.x; if (!Mathf.Approximately(initial.y, changed.y)) toApply.y = _transform.localPosition.y; if (!Mathf.Approximately(initial.z, changed.z)) toApply.z = _transform.localPosition.z; return toApply; } } |
In the StandardTransformInspector() method we have a few things going on. First, we set up some bools to flag when a value is changed in the inspector and we store the initial position, rotation, and scale of our transform so that we can make a comparison later. Then you’ll see three spots where we check for changes with EditorGUI.BeginChangeCheck() and flag our bools if a change has occurred by checking EditorGUI.EndChangeCheck(). Once that has finished and when know what if something has changed we now use Undo.RecordObject() to record the state of the object before any change has been made (this allows use to Undo the operation). Then we simply apply only the changes that have occurred.
Next, we have some adjustments to make to get our inspector to work like Unity’s default inspector. Since we’re using BeginChangeCheck() and EndChangeCheck() our changes will only be applied to the last selected object. So this basically breaks multi-selection editing which is what we’re fixing next.To help us out I created another method, ApplyChangesOnly(), which will only apply a change to the x, y, or z value of the vector if it was changed in the selected transform. So if you change the x position it only changes the x position of all selected objects. Similarly I set up an undo state if anything will be changed, then iterate through all of the selected transforms (retrieved with Selection.transforms) and apply changes when it is appropriate.
That’ll cover all the changes we need for recreating the default inspector for transforms. The only actual change I made over the default is I named the “Rotation” fields to “Euler Rotation”. This is just so that we can see how to do this, and we’ll be showing the Quaternion rotation in the inspector next.
Showing the Quaternion Rotation
|
1 2 3 4 5 6 7 |
public override void OnInspectorGUI() { //We need this for all OnInspectorGUI sub methods _transform = (Transform)target; StandardTransformInspector(); QuaternionInspector(); } |
|
1 2 3 4 5 6 7 8 9 10 11 12 13 14 15 16 17 18 19 20 21 22 23 24 25 26 27 28 29 |
private static bool quaternionFoldout = false; private void QuaternionInspector() { //Additional element to also view the Quaternion rotation values quaternionFoldout = EditorGUILayout.Foldout(quaternionFoldout, "Quaternion Rotation: " + _transform.localRotation.ToString("F3")); if (quaternionFoldout) { EditorGUI.BeginChangeCheck(); Vector4 qRotation = EditorGUILayout.Vector4Field("Be careful!", QuaternionToVector4(_transform.localRotation)); if (EditorGUI.EndChangeCheck()) { Undo.RecordObject(_transform, "modify quaternion rotation on " + _transform.name); _transform.localRotation = ConvertToQuaternion(qRotation); } } } private Quaternion ConvertToQuaternion(Vector4 v4) { return new Quaternion(v4.x, v4.y, v4.z, v4.w); } private Vector4 QuaternionToVector4(Quaternion q) { return new Vector4(q.x, q.y, q.z, q.w); } |
Now we have a custom inspector for transform components that shows us (and allows us to edit) the quaternion rotation. Pretty cool, but not overly useful. Next up we’re going to add some utilities to our inspector to get the most out of it.
Showing the Local Axis
|
1 2 3 4 5 6 7 8 9 10 11 12 13 14 15 16 17 18 19 20 21 |
using UnityEngine; public class ShowLocalAxis : MonoBehaviour { [HideInInspector] public bool destroyWhenSafe = false; [Range(1f,100f)] public float handleLength = 10f; public void OnDrawGizmos() { Gizmos.matrix = transform.localToWorldMatrix; Gizmos.color = Color.blue; Gizmos.DrawLine(Vector3.zero, Vector3.forward * handleLength); Gizmos.color = Color.red; Gizmos.DrawLine(Vector3.zero, Vector3.right * handleLength); Gizmos.color = Color.yellow; Gizmos.DrawLine(Vector3.zero, Vector3.up* handleLength); } } |
To accomplish safe destruction of component via another component we’ll need a custom inspector that waits for the proper time to destroy the component. Otherwise, we’ll get some nasty errors in Unity. The below script does just that. We don’t care about any special display, but since we used HideInInspector and Range in ShowLocalAxis, we’ll use base.DrawDefaultInspector() to show the default view instead of base.OnInspectorGUI() that I mentioned before. So what happens is our custom transform component will set the destroyWhenSafe bool to true, then when the editor’s state is Repaint we can safely destroy the ShowLocalAxis component.
|
1 2 3 4 5 6 7 8 9 10 11 12 13 14 15 16 17 18 |
using UnityEngine; using UnityEditor; [CustomEditor(typeof(ShowLocalAxis))] public class ShowLocalAxisInspector : Editor { public override void OnInspectorGUI() { base.DrawDefaultInspector(); ShowLocalAxis showRotated = (ShowLocalAxis)target; if (showRotated.destroyWhenSafe && Event.current.type == EventType.Repaint) { DestroyImmediate(showRotated); return; } } } |
Now we have our component all set up, let’s integrate it with our custom transform component. For this we’ll make a new method called ShowLocalAxisComponentToggle() and change our CustomTranformComponent‘s OnInspectorGUI() to so it calls the method like this:
|
1 2 3 4 5 6 7 8 9 |
public override void OnInspectorGUI() { //We need this for all OnInspectorGUI sub methods _transform = (Transform)target; StandardTransformInspector(); QuaternionInspector(); ShowLocalAxisComponentToggle(); } |
In Next up is the ShowLocalAxisComponentToggle() method, For this we’ll need a private bool, showLocalAxisToggle, that will be used to toggle on/off the ShowLocalAxis component. And we’ll need a First, we start off by adding some padding above the rest of the GUI elements with two calls to Unity’s EditorGUILayout.Space() method. Next we attempt to see if there is a ShowLocalAxis component attached to the game object. If there is then we set our showLocalAxisToggle to true and display it in the inspector. This time we’re going to use a horizontal layout (which starts a horizontal section where the GUI elements will be placed) by calling EditorGUILayout.BeginHorizontal(). Then we use a EditorGUILayout.LabelField(), start to monitor changes, and display a EditorGUILayout.ToggleLeft() with a corresponding label of “on” or “off” based on the existence of the ShowLocalAxis component. If the toggle changes value then we add the component and move it up to the second position so that it is right under the transform component. If we’re toggling the ShowLocalAxis to off then we flag it with destroyWhenSafe and allow the ShowLocalAxis component to destroy itself when it is safe to do so. The full method looks like this:
|
1 2 3 4 5 6 7 8 9 10 11 12 13 14 15 16 17 18 19 20 21 22 23 24 25 26 27 28 29 30 31 32 33 34 35 36 |
private bool showLocalAxisToggle = false; private void ShowLocalAxisComponentToggle() { EditorGUILayout.Space(); EditorGUILayout.Space(); ShowLocalAxis showLocalAxis = _transform.gameObject.GetComponent<ShowLocalAxis>(); if (showLocalAxis == null) showLocalAxisToggle = false; else showLocalAxisToggle = true; EditorGUILayout.BeginHorizontal(); EditorGUILayout.LabelField("Show local rotation handles", EditorStyles.boldLabel); EditorGUI.BeginChangeCheck(); // We use GUILayout.Toggle here instead of EditorGUI toggle because they cause horizontal overflow showLocalAxisToggle = GUILayout.Toggle(showLocalAxisToggle, (showLocalAxisToggle ? "on" : "off" )); if (EditorGUI.EndChangeCheck()) { if (showLocalAxisToggle == true) { showLocalAxis = _transform.gameObject.AddComponent<ShowLocalAxis>(); int componentCount = _transform.GetComponents<Component>().Length; for (int i = 1; i < componentCount; i++) { UnityEditorInternal.ComponentUtility.MoveComponentUp(showLocalAxis); } } else { showLocalAxis.destroyWhenSafe = true; } } EditorGUILayout.EndHorizontal(); } |
That takes care of showing the local axis. Now we’ve learned how to create custom inspectors, do some layout, show axis line gizmos, and safely add/remove a component from another component. In the next section I will show you how to add even more functionality to the transform component. We’ll set up methods for aligning selected game objects to each other, randomly rotating them, randomly scaling them, and randomly positioning them. Each of which can be very helpful in speeding up level design.
Part II: Special Operations
|
1 2 3 4 5 6 7 8 9 10 11 12 13 14 15 16 17 18 19 20 21 22 23 24 25 26 27 28 29 30 31 32 33 34 35 36 |
private AnimBool m_showExtraFields; private static bool _showExtraFields; void OnEnable() { m_showExtraFields = new AnimBool(_showExtraFields); m_showExtraFields.valueChanged.AddListener(Repaint); } private void SpecialOperations() { EditorGUILayout.Space(); EditorGUILayout.Space(); m_showExtraFields.target = EditorGUILayout.ToggleLeft("Special operations", m_showExtraFields.target); if (EditorGUILayout.BeginFadeGroup(m_showExtraFields.faded)) { AlignmentInspector(); EditorGUILayout.Space(); EditorGUILayout.Space(); RandomRotatationInspector(); EditorGUILayout.Space(); EditorGUILayout.Space(); RandomScaleInspector(); EditorGUILayout.Space(); EditorGUILayout.Space(); RandomPositionInspector(); } _showExtraFields = m_showExtraFields.value; EditorGUILayout.EndFadeGroup(); } |
Custom Button
Before we dig in, each of these inspectors will have buttons associated with them. Unity’s default for an inspector button is to stretch its width to fit the inspector window. I don’t really like that so I went ahead and created my own button. First I define a GUILayoutOption to set the width of all the buttons to 200 (I found this number after I made all my buttons and could see their width). Then in the Button() method I wrap everything in a horizontal layout, add flexible spaces to the left and right of the button (this centers it), I then get the bool value from Unity’s GUILayout.Button() so I can return it from the new method.
|
1 2 3 4 5 6 7 8 9 10 |
private GUILayoutOption[] buttonOptions = new GUILayoutOption[1] { GUILayout.Width(200f) }; private bool Button(string label) { GUILayout.BeginHorizontal(); GUILayout.FlexibleSpace(); bool value = GUILayout.Button(label, buttonOptions); GUILayout.FlexibleSpace(); GUILayout.EndHorizontal(); return value; } |
Alignment Inspector
|
1 2 3 4 5 |
public enum AlignToType { lastSelected, firstSelected } public enum AxisFlag { X = 1, Y = 2, Z = 4 } public AlignToType alignTo = AlignToType.lastSelected; public AxisFlag alignmentAxis = AxisFlag.X; |
Next up is our method to actually perform the alignment operation, this is called AlignTo(). First it gets an array of all of the selected transformas then it determines the index in that array (targetIndex) of the transform (or GameObject) we’ll be aligning to. This is index 0 for the first selected and the last index of the array to align to the last selected transform. Then we iterate through all of the selected transforms and set their positions that should be aligned to the position of the selected transform. While doing this for loop, we ensure we skip over the selected transfor, because it makes no sense to move it to itself. Finally, we use Undo.RecordObject() so that we can reverse these operations.Some of you may be familiar with bitwise operations and may see the & in the conditions. Others of you are probably wonder what statements like
|
1 |
if ((axis & AxisFlag.X) == AxisFlag.X) |
actually mean. The single & is a binary AND operator. What this does is it copies the bit to the results IF the bit exists in both operands (axis and AxisFlag.X). So if axis contains the bit for AxisFlax.X the result will be AxisFlag.X. This is why we’re using powers of 2 for our AxisFlag enum’s values. Basics on bitwise operators in C# can be found here at tutorialspoint.com. The full AlignTo() method is as follows:
|
1 2 3 4 5 6 7 8 9 10 11 12 13 14 15 16 17 18 19 20 21 22 23 24 25 26 27 28 29 30 31 |
private void AlignTo(AlignToType to , AxisFlag axis) { Transform[] selectedTransforms = Selection.transforms; int targetIndex = 0; if (to == AlignToType.lastSelected) targetIndex = selectedTransforms.Length - 1; for (int i = 0; i < selectedTransforms.Length; i++) { if (i == targetIndex) continue; Vector3 temp = selectedTransforms[i].position; if ((axis & AxisFlag.X) == AxisFlag.X) temp.x = selectedTransforms[targetIndex].position.x; if ((axis & AxisFlag.Y) == AxisFlag.Y) temp.y = selectedTransforms[targetIndex].position.y; if ((axis & AxisFlag.Z) == AxisFlag.Z) temp.z = selectedTransforms[targetIndex].position.z; Undo.RecordObject( selectedTransforms[i], selectedTransforms[i].name + " aligned to " + selectedTransforms[targetIndex].name); selectedTransforms[i].position = temp; } } |
|
1 2 3 4 5 6 7 8 9 10 11 12 13 14 15 16 17 18 19 20 21 22 23 24 25 26 27 28 29 |
private void AlignmentInspector() { EditorGUILayout.LabelField("Alignment", EditorStyles.boldLabel, layoutMaxWidth); alignTo = (AlignToType)EditorGUILayout.EnumPopup("Align to", alignTo, layoutMaxWidth); alignmentAxis = (AxisFlag)EditorGUILayout.EnumMaskField("Axis", alignmentAxis, layoutMaxWidth); string buttonLabel = "Select another object to align to"; bool enableButton = false; Transform[] selectedTransforms = Selection.transforms; if (selectedTransforms.Length > 1) { if (alignTo == AlignToType.lastSelected) { buttonLabel = "Align to " + selectedTransforms[selectedTransforms.Length - 1].name; } else { buttonLabel = "Align to " + selectedTransforms[0].name; } enableButton = true; } GUI.enabled = enableButton; if (Button(buttonLabel)) { AlignTo(alignTo, alignmentAxis); } GUI.enabled = true; } |
Random Rotation Inspector
|
1 2 3 4 5 6 7 8 9 10 11 12 13 14 15 16 17 18 19 20 21 22 23 24 25 26 27 28 29 30 31 32 33 34 35 36 37 38 39 40 41 42 |
public AxisFlag rotationAxisFlag; private void RandomRotatationInspector() { EditorGUILayout.LabelField("Random Rotation", EditorStyles.boldLabel, layoutMaxWidth); rotationAxisFlag = (AxisFlag)EditorGUILayout.EnumMaskField("Rotation Axis", rotationAxisFlag, layoutMaxWidth); Transform[] selectedTransforms = Selection.transforms; string label = "Rotate " + _transform.name; if (selectedTransforms.Length > 1) label = "Rotate selected"; if (Button(label)) { RandomRotate(rotationAxisFlag , selectedTransforms); } } private void RandomRotate(AxisFlag axis , Transform[] selected) { for (int i = 0; i < selected.Length; i++) { Vector3 temp = selected[i].localEulerAngles; if ((axis & AxisFlag.X) == AxisFlag.X) temp.x = RdmDeg(); if ((axis & AxisFlag.Y) == AxisFlag.Y) temp.y = RdmDeg(); if ((axis & AxisFlag.Z) == AxisFlag.Z) temp.z = RdmDeg(); Undo.RecordObject(_transform, "random rotate " + selected[i].name); selected[i].localEulerAngles = temp; } } private float RdmDeg() { return Random.Range(0f, 360f); } |
Random Scale Inspector and Random Position Inspector
|
1 2 3 4 5 6 7 8 9 10 11 12 13 14 15 16 17 18 19 20 21 22 23 24 25 26 27 28 29 30 31 32 33 34 35 36 37 38 39 40 41 42 43 44 45 46 47 48 49 50 51 52 53 54 55 56 57 58 59 60 61 62 63 64 65 66 67 68 69 70 71 72 73 74 75 76 77 78 79 80 81 82 83 84 85 86 87 88 89 90 91 92 93 94 95 96 97 |
private AxisFlag scaleAxisFlag; private float minScale, maxScale; private bool scaleSame = true; private void RandomScaleInspector() { EditorGUILayout.LabelField("Random Scale (local)", EditorStyles.boldLabel, layoutMaxWidth); scaleAxisFlag = (AxisFlag)EditorGUILayout.EnumMaskField("Scale Axis", scaleAxisFlag, layoutMaxWidth); scaleSame = EditorGUILayout.ToggleLeft("Scale same", scaleSame, layoutMaxWidth); minScale = EditorGUILayout.FloatField("Min:", minScale, layoutMaxWidth); maxScale = EditorGUILayout.FloatField("Max", maxScale, layoutMaxWidth); Transform[] selectedTransforms = Selection.transforms; string btnLabel = "Scale " + _transform.name; if (selectedTransforms.Length > 1) btnLabel = "Scale selection"; if (Button(btnLabel)) { RandomScale(scaleAxisFlag, selectedTransforms, scaleSame); } } private void RandomScale(AxisFlag axis, Transform[] selected , bool scaleSame) { for (int i = 0; i < selected.Length; i++) { Vector3 temp = selected[i].localScale; Vector3 random = Vector3.zero; if (scaleSame) { float rdm = Random.Range(minScale, maxScale); random.x = rdm; random.y = rdm; random.z = rdm; } else { random.x = Random.Range(minScale, maxScale); random.y = Random.Range(minScale, maxScale); random.z = Random.Range(minScale, maxScale); } if ((axis & AxisFlag.X) == AxisFlag.X) temp.x = random.x; if ((axis & AxisFlag.Y) == AxisFlag.Y) temp.y = random.y; if ((axis & AxisFlag.Z) == AxisFlag.Z) temp.z = random.z; Undo.RecordObject(_transform, "random scale " + selected[i].name); selected[i].localScale = temp; } } private Vector3 minPosition, maxPosition; private void RandomPositionInspector() { EditorGUILayout.LabelField("Random Position", EditorStyles.boldLabel, layoutMaxWidth); minPosition = EditorGUILayout.Vector3Field("Min", minPosition, layoutMaxWidth); maxPosition = EditorGUILayout.Vector3Field("Max", maxPosition, layoutMaxWidth); Transform[] selectedTransforms = Selection.transforms; string btnLabel = "Move " + _transform.name; if (selectedTransforms.Length > 1) btnLabel = "Move selection"; if (Button(btnLabel)) { RandomPosition(minPosition, maxPosition, selectedTransforms); } } private void RandomPosition(Vector3 min , Vector3 max, Transform[] t) { for (int i = 0; i < t.Length; i++) { Vector3 temp = t[i].position; if (!Mathf.Approximately(min.x, max.x)) temp.x = Random.Range(min.x, max.x); if (!Mathf.Approximately(min.y, max.y)) temp.y = Random.Range(min.y, max.y); if (!Mathf.Approximately(min.z, max.z)) temp.z = Random.Range(min.z, max.z); Undo.RecordObject(t[i], "Random position " + t[i].name); t[i].position = temp; } } |
Final Thoughts (and some homework)
![]()
Thank you for this, i’ve been trying to make my own custom transform which snaps to the pixel grid but EditorGUI.BeginChangeCheck() only seems to work when changing the value directly in the inspector and not when using the transform tool, also when rounding the transform animations no longer seem to work, do you know why?
Thanks
BeginChangeCheck only works on fields that are contained within the Begin/End change check and only those in the inspector (it’s actually checking for user-editing of the fields). If you want to detect Scene view changes then you’ll have to continually compare a previous value with the new value. I’m not 100% sure that will work. This may also work for you: https://docs.unity3d.com/ScriptReference/Transform-hasChanged.html
As for the transform animations no longer working, I’ll need some more details on what you’re talking about to help with that.
I appreciate the quick reply
Basically what i’m trying to do is round all transforms so that my sprites move pixel-by-pixel, the floating point precision is a problem for my project.
I tried to round the transform and even tho it looked a bit jittery when moved it sorta snapped in place, but animated transforms no longer move.
It’s as if animations translate objects by adding to their transform, in my case that added value is constantly being snapped back to the rounded position, so it never moves.
By the way if “(_transform.hasChanged)” works perfectly
Solved it by using OnSceneGUI() to do the snap, i’m new to Custom Editor stuff so still not sure of what i’m doing.
I’ve never had to use OnSceneGUI() and I’m surprised that a custom editor was affecting animations. Custom Inspector code should only be running on a selected game object. Did you know that Unity has snapping? Might not help if you have a lot of different snap sizes, but thought you should know.
https://unity3d.com/learn/tutorials/topics/tips/snapping
Yeah i know Unity has snapping but i’m getting tired of holding the CTRL key all the time and making sure that no sprites have accidentally moved without the snap, so i wanted to make my own custom transform component that is limited to the pixel grid (rounded to two decimals) , i had other issues so i just gave up the idea, it’s nice to know what can be done tho.
nice article and very useful thank so for Bitwise Operator
Thanks Sharing Good Article
Just a fair warning, there is a bug in the ApplyChangesOnly() function where no matter what value you are changing (position, rotation, or scale) It checks if it should be changed using the changed.x/y/z but then always uses _transform.localScale.x/y/z regardless of what is being changed.
I believe it should be using change.x/y/z
With this bug, if you set the _rotation_ value to 90 but the y _position_ is 4000, it will try to set the rotation of all selected objects to 4000. This only appears to cause problems when setting values on multiple objects at once. If you set a single object it doesn’t use that function so you don’t see it happen.
Thanks for letting us know!
Very much appreciated. Thank you for this excellent article. Keep posting!