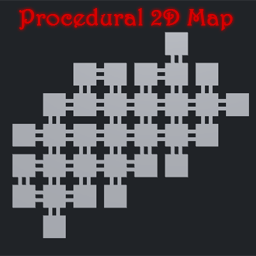
 Procedural Generation is one of the most useful and complex practices in game programming. It’s often difficult to get into because it’s quite abstract which can make it difficult to grasp. It can also be quite time consuming to experiment with and there are many different ways to get the results you want. It’s extremely useful because it can help us to generate nearly endless amounts of content on the fly. It can be used in level designing where you don’t want to generate the levels on the fly, but instead want to predetermine your levels. In this tutorial we’ll take a look at a basic procedural method to generate a 2D level’s map. Since this is the core of some basic procedural generation it can be extended and made to suit a variety of needs.
The Concept
First off, let’s talk about how we’ll generate our level; what are our needs. For this example we’ll be using simple squares on a grid that have up to 4 transition points (N, E, S, W). We’ll need to ensure those points connect to other areas and build out our map. So how will we do this? Let’s step through the process.
Each of our Areas will have available transitions defined on them (North, East, South, and/or West). We’ll start off with a list of these predefined areas (or templates) so that we can choose from them to generate our level. First, we just pick one at random. Then we place that in a list of “generated areas”. Next we work our way along each of its available transition points and connect new areas to them. Connections are made both ways: one to the initial area and one to the new area. Visually the algorithm would look something like this:
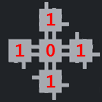
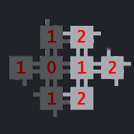
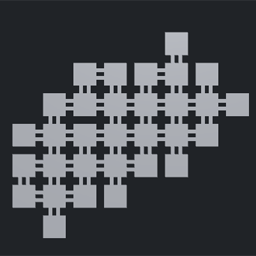
We start at zero and add all of the ones, while ensuring that the connections go both ways. This is helpful to mark the transitions on as “used”. Each of the areas get added to the “generated areas” list. In the next step of our algorithm we will select an area from that list that doesn’t have all of its transitions used. We then repeat the process, but need to make sure that we look for any areas that are blocking the way (i.e. they can’t be transitioned into from an area because they don’t have a transition in that direction). Likewise, if there is an area in the way already and we can connect to it, then we should do so. We would now have a map that would be something like this:
The we simply continue in that fashion for a set number of iterations or until the areas have all their transitions covered. Here’s an animation of the algorithm in action.
As you can see, the algorithm works its way around the map connecting the transitions as it goes. Pretty nifty to watch it in action. An animation like this really helps me because I can actually watch the algorithm work. Let’s dig in further and take a look at the code.
The Code Structure
The code needed for this procedural level generation is broken down into multiple components:
- Direction enum: This represents the place where a transition will be available on our AreaDatas .
- Coordinates struct: This is used to map our areas to a world location in the game and allows us to work in a grid which in turn allows us to easily find existing areas to connect to or find out they’re blocking the way.
-
AreaData class: This is the class that will store all of the information about our areas (generated and templates).
- The
AreaData class will have:
- A name to identify it by.
- An array of available transitions ( Direction[] ).
- Coordinates to tells us where on the map it should be place.
- A Dictionary of Directions with values that are a pairing of AreaData and Direction this will store the transitions to/from this area.
- The
AreaData class is responsible for:
- Marking a transition as used.
- Supplying a string list of the Directions in an array (also used to generate a name for each AreaData).
- Reporting the count of transitions that have been used.
- Reporting if a Direction is available to create a transition on.
- Reporting if it has ANY available Direction for placing a transition.
- And, of course, a ToString() method to supply a readable representation of the object.
- The
AreaData class will have:
- Utility classes:
- We’ll have some small extension classes (one for Direction and one for Coordinate ) that will help us out.
- We’ll have an Area:MonoBehaviour class that will simply contain an AreaData and a corresponding custom inspector so that we can examine the AreaData on our visual representations.
-
SceneGenerator : Finally we’ll have the class that contains the algorithm for generating our scene. This will inherit from
MonoBehaviour so that we can setup some
AreaData templates in the inspector and the number of iterations our algorithm should run through.
- Properties and fields:
- int iterations : number of times our algorithm will run.
- AreaData[] areaDatas : a list that we can set in the inspector. These are our templates.
- List<AreaData> generatedAreas : a list that will contain all of the areas that the algorithm generates.
- Methods:
- Reset() : This is a MonoBehaviour event that is called when you add the class as a component to a game object (or Reset the component). This method will just randomly fill out the areaDatas array so that we don’t have to start from scratch.
- Generate() : This is our main algorithm for generating the map.
- AreaData GetGeneratedAreaByCoordinates(Coordinates coordinates) : This will look through the generatedAreas list for an AreaData with matching coordinates. This will be used to find if there is already an area that we can possibly connect to or is blocking a transition.
- AreaData CreateRandomAreaWithTransition(Direction transition) : This will create a new area (a copy) of a randomly selected area in the list of areaDatas that has an availableTransition in the specified direction. This is used when we’re adding areas to connect to.
- CreateCubeRepresentation() : Finally, we’ll want to see our results, so this method will create a simple representation of the map for us to see.
- Properties and fields:
All of these pieces work together to procedurally generate our map. This may feel a little overwhelming, but each class is as small as possible so that we can understand the small pieces and more easily put them together. Let’s move on to the actual code!
Direction enum
 First up we have our Direction enum and its extension class. I think they’re pretty self explanatory, but I’d like to quickly touch on what an extension class is. An extension class is a static class with static members that act on a specific object type. In this case the only member, GetOpposite, acts upon a Direction and returns a Direction opposite to the direction acted upon. It would be used like so:
Direction opposite = Direction.N.GetOpposite();
In this specific example opposite would be Direction.S . Extensions are just a handy way to have some quickly accessible methods that don’t need to belong to an instance of a class. Also, enums aren’t classes or structs so they can’t have methods. Extensions allow us to have methods that can act on an enum. Here’s the full code for our Direction enum.
|
1 2 3 4 5 6 7 8 9 10 11 12 13 14 15 16 17 18 19 20 21 22 23 |
public enum Direction { None, N, E, S, W } public static class DirectionExt { public static Direction GetOpposite(this Direction direction) { switch (direction) { case Direction.N: return Direction.S; case Direction.E: return Direction.W; case Direction.S: return Direction.N; case Direction.W: return Direction.E; default: throw new System.Exception( "Invalid Direction: " + direction.ToString()); } } } |
Coordinates
Next up we have our Coordinates struct. I use this instead of a Vector2 for a few reasons:
- Float comparison is imprecise and we can’t really say float a = float b with complete certainty. We can use Mathf.Approximately() , but that’s overhead and we don’t need float values in the algorithm.
- We don’t need fractional values. In programming it is best to just use exactly what you need. It conveys the intent you had when making the code and tells others (and your future self) there was a reason we aren’t using floats!
- A Vector2 doesn’t have the methods we need and has a bunch of others we don’t need.
I could probably go on, but those are the main points. The funny thing is: I still needed a method to convert coordinates to a vector2. This was purely out of convenience so I could type transform.position = coordinate.ToVector2() instead of transform.position = new Vector2(coordinate.x, coordinate.y) . Here’s the struct in it’s entirety:
|
1 2 3 4 5 6 7 8 9 10 11 12 13 14 15 16 17 18 19 20 21 22 23 24 25 26 27 28 29 30 31 32 33 34 35 36 37 38 39 40 41 42 43 44 45 46 47 48 49 50 51 52 53 54 55 56 |
using UnityEngine; public struct Coordinates { public int x; public int y; public Coordinates(int x, int y) { this.x = x; this.y = y; } public override string ToString() { return string.Format("({0},{1})", x, y); } public Vector2 ToVector2() { return new Vector2(x, y); } /// <summary> /// Returns the coordinate for an adjacent area based on the supplied direction. /// </summary> /// <param name="direction"> /// The direction the adjacent coordinate is at. /// </param> /// <returns> /// A new set of coordinates for that are adjacent to this coordinate. /// </returns> public Coordinates GetAdjacentCoordinate(Direction direction) { int x = this.x; int y = this.y; switch (direction) { case Direction.N: y += 1; break; case Direction.E: x += 1; break; case Direction.S: y -= 1; break; case Direction.W: x -= 1; break; default: break; } return new Coordinates(x, y); } } |
AreaData
 Next up we get to the AreaData class. This handles all of the things we need to know about on the areas. The code has been liberally commented so you can see what each member does.
|
1 2 3 4 5 6 7 8 9 10 11 12 13 14 15 16 17 18 19 20 21 22 23 24 25 26 27 28 29 30 31 32 33 34 35 36 37 38 39 40 41 42 43 44 45 46 47 48 49 50 51 52 53 54 55 56 57 58 59 60 61 62 63 64 65 66 67 68 69 70 71 72 73 74 75 76 77 78 79 80 81 82 83 84 85 86 87 88 89 90 91 92 93 94 95 96 97 98 99 100 101 102 103 104 105 106 107 108 109 110 111 112 113 114 115 116 117 118 119 120 121 122 123 124 125 126 127 128 129 130 131 132 133 134 135 136 137 138 139 140 141 142 143 144 145 146 147 148 149 150 151 152 153 154 155 156 157 158 159 160 161 162 163 164 165 166 167 168 169 170 171 172 173 174 175 176 177 178 179 180 |
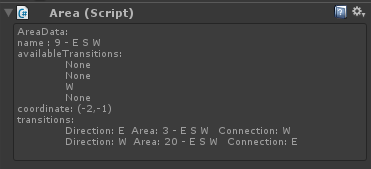
using System; using System.Collections.Generic; using UnityEngine; [Serializable] // Serialized so it will show in Unity's inspector. public class AreaData { public string name; /// <summary> /// The transitions that are available on this Area /// </summary> public Direction[] availableTransitions; public Coordinates coordinates; /// <summary> /// The transitions that have been connected to. /// </summary> public Dictionary<Direction, KeyValuePair<AreaData, Direction>> transitions = new Dictionary<Direction, KeyValuePair<AreaData, Direction>>(); /// <summary> /// Constructor with the minimum required values to set up the properties. /// </summary> /// <param name="name">The name of the area</param> /// <param name="availableTransitions"> /// A list of transitions this area has. This list is copied. /// </param> public AreaData(string name, Direction[] availableTransitions) { this.name = name; // We need to make a copy of this array since it will be supplied from // a template AreaData and we don't want to affect the original. this.availableTransitions = new Direction[availableTransitions.Length]; availableTransitions.CopyTo(this.availableTransitions, 0); } /// <summary> /// When the transition has been used we will add it to the transitions list. /// </summary> /// <param name="thisAreasTransition"> /// The transition on this area that is being used up. /// </param> /// <param name="areaConnectedTo"> /// The area that this transition connects to. /// </param> /// <param name="areasConnection"> /// The connection on the area that this transition connects to (should always be opposite). /// </param> public void SetTransitionUsed( Direction thisAreasTransition, AreaData areaConnectedTo, Direction areasConnection) { if (transitions == null) transitions = new Dictionary<Direction, KeyValuePair<AreaData, Direction>>(); if (!transitions.ContainsKey(thisAreasTransition)) { transitions.Add( thisAreasTransition, new KeyValuePair<AreaData, Direction>(areaConnectedTo, areasConnection)); } else throw new Exception("transition: " + thisAreaTransition + " has already been used!"); } /// <summary> /// Returns a string representation of the supplied direction array. /// Used in generating the names of an AreaData. /// </summary> /// <param name="array">The array of Directions to convert to a string.</param> /// <returns>a string representation of the supplied direction array.</returns> public static string GetTransitionList(Direction[] array) { string s = ""; for (int i = 0; i < array.Length; i++) { s += array[i].ToString() + " "; } return s; } /// <summary> /// How many transitions have been set up? /// </summary> /// <returns>The count of transitions that have been set on this AreaData.</returns> public int GetTransitionCount() { return transitions == null ? 0 : transitions.Count; } /// <summary> /// Tells us if the direction has been used or if it is available on this AreaData at all. /// </summary> /// <param name="direction">The direction to check.</param> /// <returns> /// True if the a transition in the Direction can be made, otherwise false. /// </returns> public bool GetIsTransitionAvailable(Direction direction) { bool isAvailable = false; for (int i = 0; i < availableTransitions.Length; i++) { if (availableTransitions[i] == direction) { isAvailable = true; break; } } if (!isAvailable) return false; if (transitions == null) transitions = new Dictionary<Direction, KeyValuePair<AreaData, Direction>>(); foreach (var item in transitions) { if (item.Key == direction) return false; } return true; } /// <summary> /// Does this AreaData have ANY available transitions? /// </summary> /// <returns>True if there are available transitions, otherwise false.</returns> public bool HasAnyAvailableTransition() { int availableTransitionCount = 0; foreach (var item in availableTransitions) { if (item != Direction.None) availableTransitionCount++; } return availableTransitionCount > (transitions == null ? 0 : transitions.Count); } /// <summary> /// A user-friendly string representation of this AreaData. /// </summary> /// <returns>A user-friendly string representation of this AreaData.</returns> public override string ToString() { string s = "name : " + name + "\n"; s += "availableTransitions: \n"; foreach (var item in availableTransitions) { s += "\t" + item.ToString() + "\n"; } s += "coordinate: " + coordinates.ToString() + "\n"; s += "transitions: \n"; if (transitions == null) transitions = new Dictionary<Direction, KeyValuePair<AreaData, Direction>>(); foreach (var item in transitions) { s += "\tDirection: " + item.Key.ToString() + " Area: " + item.Value.Key.name + " Connection: " + item.Value.Value.ToString() + "\n"; } return s; } } |
Companion Classes
Next up, I created two companions scripts that really don’t do anything, but help debug. The first is the Area : MonoBehaviour class. This simply contains an AreaData member so that we can view the values in the inspector.
|
1 2 3 4 5 6 |
using UnityEngine; public class Area : MonoBehaviour { public AreaData areaData { get; set; } } |
The second script is a simple inspector script that will display the AreaData’s ToString() output in a HelpBox like so (make sure this script goes into an “Editor” folder!):
|
1 2 3 4 5 6 7 8 9 10 11 12 13 14 15 16 17 |
using UnityEditor; [CustomEditor(typeof(Area))] public class AreaInspector : Editor { private Area _area; public override void OnInspectorGUI() { _area = (Area)target; if (_area.areaData != null) EditorGUILayout.HelpBox("AreaData: \n" + _area.areaData.ToString(), MessageType.None, true); else EditorGUILayout.HelpBox("Area data is null", MessageType.Error); } } |
The SceneGenerator class
 Finally we get to the algorithm that works out where to place our areas. I’ve liberally commented the code as usual, but let’s walk through it a bit. We have the number of
iterations or attempts to connect paths. One iteration will take a single area and make all the connections it can to that area. Two iterations will start working on an area connected to the first area, and so forth. I find with the example project on GitHub that 10 iterations is the max (i.e. I don’t get more connections). Then there is an array of AreaDatas (
areaDatas ), these are the templates we’ll use when selecting areas at “random” and making our map. Then I have a List of AreaDatas (
generatedAreas ) that contains the AreaDatas that get generated by the algorithm.
Finally we get to the algorithm that works out where to place our areas. I’ve liberally commented the code as usual, but let’s walk through it a bit. We have the number of
iterations or attempts to connect paths. One iteration will take a single area and make all the connections it can to that area. Two iterations will start working on an area connected to the first area, and so forth. I find with the example project on GitHub that 10 iterations is the max (i.e. I don’t get more connections). Then there is an array of AreaDatas (
areaDatas ), these are the templates we’ll use when selecting areas at “random” and making our map. Then I have a List of AreaDatas (
generatedAreas ) that contains the AreaDatas that get generated by the algorithm.
The first method, Reset() , is a MonoBehaviour event that is called whenever a script is added in the inspector (or is reset by the context menu). In my Reset() method I simply create 4 random AreaDatas because… I’m lazy 😛 . Of course, you should fill in your own area datas in the inspector to experiment. The more areas with greater number of connections, the bigger the map will be able to grow.
Next up is the main algorithm, Generate() , this starts off by randomly selecting an AreaData from the array of templates (actually creates a new one with the same values, this is important!). Then we iterate through the algorithm for the number of indicated iterations. In the main algorithm is a sub-algorithm to find other areas to connect to the current area. In this sub-algorithm we examine each availableTransition on the current area and look for an existing AreaData ( adjacentArea ) to connect to. If one is not found then we create an adjacentArea with CreateRandomAreaWithTransition() that has a transition opposite of our current area. Then we add them both to the generatedAreas List and flag their corresponding transitions as used so we don’t check those transition in future iterations. Finally, we look for an area in the generatedAreas List that has open transitions and we repeat our algorithm to connect it to existing or new areas.
To do all of this we need a couple of companion methods. GetGeneratedAreaByCoordinate() simply looks at the list of generatedAreas to see if there is one at the indicated coordinate. We use this to attach our current area to an existing area (if the transition between the two exists). We also have CreateRandomAreaWithTransition() which will look through the list of template areas for one with an available transition that we need. It starts iterating through the list at a random index to provide some variation.
Last, but not least, is CreateCubeRepresentation() this simply places a bunch of cubes at the coordinates of each area and places elongated cubes (or cuboids) at each transition point. This is really just to give us a visual representation of the layout and help us debug. It could also be captured to a texture to be displayed as a map if you like.
Here’s the class in all it’s glory!
|
1 2 3 4 5 6 7 8 9 10 11 12 13 14 15 16 17 18 19 20 21 22 23 24 25 26 27 28 29 30 31 32 33 34 35 36 37 38 39 40 41 42 43 44 45 46 47 48 49 50 51 52 53 54 55 56 57 58 59 60 61 62 63 64 65 66 67 68 69 70 71 72 73 74 75 76 77 78 79 80 81 82 83 84 85 86 87 88 89 90 91 92 93 94 95 96 97 98 99 100 101 102 103 104 105 106 107 108 109 110 111 112 113 114 115 116 117 118 119 120 121 122 123 124 125 126 127 128 129 130 131 132 133 134 135 136 137 138 139 140 141 142 143 144 145 146 147 148 149 150 151 152 153 154 155 156 157 158 159 160 161 162 163 164 165 166 167 168 169 170 171 172 173 174 175 176 177 178 179 180 181 182 183 184 185 186 187 188 189 190 191 192 193 194 195 196 197 198 199 200 201 202 203 204 205 206 207 208 209 210 211 212 213 214 215 216 217 218 219 220 221 222 223 224 225 226 227 228 229 230 231 232 233 234 235 236 237 238 239 240 241 242 243 244 245 246 247 248 249 250 251 252 253 254 255 |
using UnityEngine; using System.Collections.Generic; public class SceneGenerator : MonoBehaviour { /// <summary> /// The number of iterations the generator should go through. /// </summary> public int iterations = 5; /// <summary> /// the AreaData templates that will be used in generating the scene. /// </summary> public AreaData[] areaDatas; /// <summary> /// The areas generated by Generate(). /// </summary> public List<AreaData> generatedAreas { get; set; } /// <summary> /// Is called when this component is added to a GameObject. /// Sets up some default areas. /// </summary> void Reset() { // Set up some default areas areaDatas = new AreaData[4]; int transitionCount = System.Enum.GetNames(typeof(Direction)).Length; for (int i = 0; i < areaDatas.Length; i++) { int minTransition = Random.Range(1, transitionCount); int transitionStart = Random.Range(minTransition, transitionCount); Direction[] transitions = new Direction[transitionCount - transitionStart]; int counter = 0; for (int j = transitionStart; j < transitionCount; j++) { transitions[counter] = (Direction)j; counter++; } areaDatas[i] = new AreaData(AreaData.GetTransitionList(transitions), transitions); } } void Generate() { generatedAreas = new List<AreaData>(); // Select a random area to start with. int randomAreaIndex = Random.Range(0, areaDatas.Length); AreaData randomArea = areaDatas[randomAreaIndex]; // Create a copy of the AreaData. AreaData newArea = new AreaData(randomArea.name, randomArea.availableTransitions); for (int i = 0; i < iterations; i++) { // Iterate through this area's transitions and add connections // however, we'll also need to check for existing areas blocking the way or that should be connected for (int j = 0; j < newArea.availableTransitions.Length; j++) { Direction transition = newArea.availableTransitions[j]; if (transition == Direction.None) continue; Direction opposite = transition.GetOpposite(); Coordinates adjacentAreaCoordinate = newArea.coordinates.GetAdjacentCoordinate(transition); AreaData adjacentArea = GetGeneratedAreaByCoordinate(adjacentAreaCoordinate); // if there's an area in the way check if it has an available transition opposite of this transition. if (adjacentArea != null) { if (!adjacentArea.GetIsTransitionAvailable(opposite)) { // The adjecent area cannot be transitioned to from this area. adjacentArea = null; // We should actually now flag this direction as no longer viable. newArea.availableTransitions[j] = Direction.None; } } // otherwise create a new area else { adjacentArea = CreateRandomAreaWithTransition(opposite); if (adjacentArea == null) { Debug.LogErrorFormat( "Could not GetRandomAreaWithTransition({0}). " + "Please ensure areaDatas has available transitions on all sides", opposite); } else { adjacentArea.coordinates = adjacentAreaCoordinate; generatedAreas.Add(adjacentArea); } } if (adjacentArea != null) { // assign the connection between the two areas. newArea.SetTransitionUsed(transition, adjacentArea, opposite); adjacentArea.SetTransitionUsed(opposite, newArea, transition); } } // check to see if we assigned any transitions to this new area, if so add it to the generatedAreas list. if (newArea.GetTransitionCount() > 0) { if (!generatedAreas.Contains(newArea)) generatedAreas.Add(newArea); } // otherwise did something go wrong? else { Debug.LogWarning("No transitions assigned to area: " + newArea.ToString()); } // Now we need to get the next area to work on. newArea = null; foreach (var item in generatedAreas) { if (item.HasAnyAvailableTransition()) { newArea = item; break; } } if (newArea == null) { Debug.Log("Can't find any generated areas with avilable transitions. Quitting."); break; } } } /// <summary> /// Checks the list of generated areas to see if one exists at the supplied coordinates. /// </summary> /// <param name="coordinates">Coordinates to check if an area exists at.</param> /// <returns>An area from the generated areas list matching the supplied coordinates. /// If none is found, then null is returned.</returns> private AreaData GetGeneratedAreaByCoordinate(Coordinates coordinates) { foreach (var item in generatedAreas) { if (item.coordinates.x == coordinates.x && item.coordinates.y == coordinates.y) return item; } return null; } /// <summary> /// Creates a new random area with the indicated position available. /// </summary> /// <param name="transition">The transition that needs to be available on the area.</param> /// <returns>A new AreaData with matching transition. If none can be found then null is returned.</returns> private AreaData CreateRandomAreaWithTransition(Direction transition) { int areaDatasIndex = Random.Range(0, areaDatas.Length); //Debug.Log("transition to look for: " + transition); for (int i = 0; i < areaDatas.Length; i++) { bool isTransitionAvailable = areaDatas[areaDatasIndex].GetIsTransitionAvailable(transition); //Debug.LogFormat("areaDatasIndex: {0} areaData {1} available: {2}", areaDatasIndex, areaDatas[areaDatasIndex], isTransitionAvailable); if (isTransitionAvailable) return new AreaData( areaDatas[areaDatasIndex].name, areaDatas[areaDatasIndex].availableTransitions); areaDatasIndex++; if (areaDatasIndex == areaDatas.Length) areaDatasIndex = 0; } return null; } void Start() { Generate(); CreateCubeRepresentation(); } /// <summary> /// Creates cubes for each generated area and cubes to show the transitions between each. /// Transitions are offset so that we can see 1 exists in each direction (to/from). /// </summary> void CreateCubeRepresentation() { for (int i = 0; i < generatedAreas.Count; i++) { GameObject cube = GameObject.CreatePrimitive(PrimitiveType.Cube); // Attach an Area component so we can easily inspect the AreaData in the editor. Area area = cube.AddComponent<Area>(); generatedAreas[i].name = i + " - " + generatedAreas[i].name; area.areaData = generatedAreas[i]; cube.transform.position = generatedAreas[i].coordinates.ToVector2(); cube.transform.localScale = 0.75f * Vector3.one; cube.name = generatedAreas[i].name; foreach (var item in generatedAreas[i].transitions) { Vector2 transitionPostion = 0.5f * (generatedAreas[i].coordinates.ToVector2() + item.Value.Key.coordinates.ToVector2()); GameObject transition = GameObject.CreatePrimitive(PrimitiveType.Cube); Vector3 scale = 0.125f * Vector3.one; transition.name = item.Key.ToString() + " to " + item.Value.Value.ToString(); switch (item.Key) { case Direction.N: transitionPostion.x += 0.125f; scale.y = 0.25f; break; case Direction.E: transitionPostion.y += 0.125f; scale.x = 0.25f; break; case Direction.S: scale.y = 0.25f; transitionPostion.x -= 0.125f; break; case Direction.W: transitionPostion.y -= 0.125f; scale.x = 0.25f; break; default: break; } transition.transform.position = transitionPostion; transition.transform.localScale = scale; transition.transform.SetParent(cube.transform, true); } } } } |
It’s a bit long, but not too bad at under 300 lines. The algorithm for generating the map is only about 100 lines. Short and sweet. However, it also has a lot of shortcomings and doesn’t create very interesting maps.
Shortcomings
This algorithm is pretty basic, not that it is necessarily easy to pick up (algorithms often are a challenge when you’re not used to them), but it is basic in the sense that it doesn’t take many factors into account. It just blindly places areas and you may end up with very uninteresting levels. This algorithm shouldn’t ever be able to generate a level that is impassable, but you won’t get many branches or interesting shapes. The reason for this is that we may end up having areas at the edges with only one transition. That will block us in. It’s not too hard to conquer that, but I wanted to keep this post simple and aimed toward beginners. So, the first person to extend this out so that it make more interesting shapes will get a copy of my Mobile Store Screenshot Helper. If you want to see more refinement to this algorithm, let me know in the comments and I’ll work out some more complex rules in another tutorial.
You can download the entire example project from my GitHub account here: https://github.com/Naphier/Procedural2dMap/releases/tag/v1.0
If you’re interested in diving deeper into procedural level design and need some one-on-one help, give me a shout! I’m a Unity Certified Developer and I give private lessons in a variety of programming topics.
As always, thanks for reading and don’t forget to subscribe to my email list to hear about new blog posts!
![]()
Good. Your programming is great.
Can we make different sized rooms with this?
Not as-is. This system is pretty limited just for learning purposes. But I could see someone extending this by taking the final product and combining some adjoining rooms. This would be a great learning exercise. If you take it on and share your code with us via the GitHub repository for this tutorial then I’ll give you a copy of my Mobile Store Screenshot Helper (https://assetstore.unity.com/packages/tools/utilities/mobile-store-screenshot-helper-38736) and give you credit in any articles I write on your additions.
Give it a shot!